Recipes / Mine

Browse, View, Share

Swipe to choose a drink, swipe up or tap the glass for its recipe, then share it.
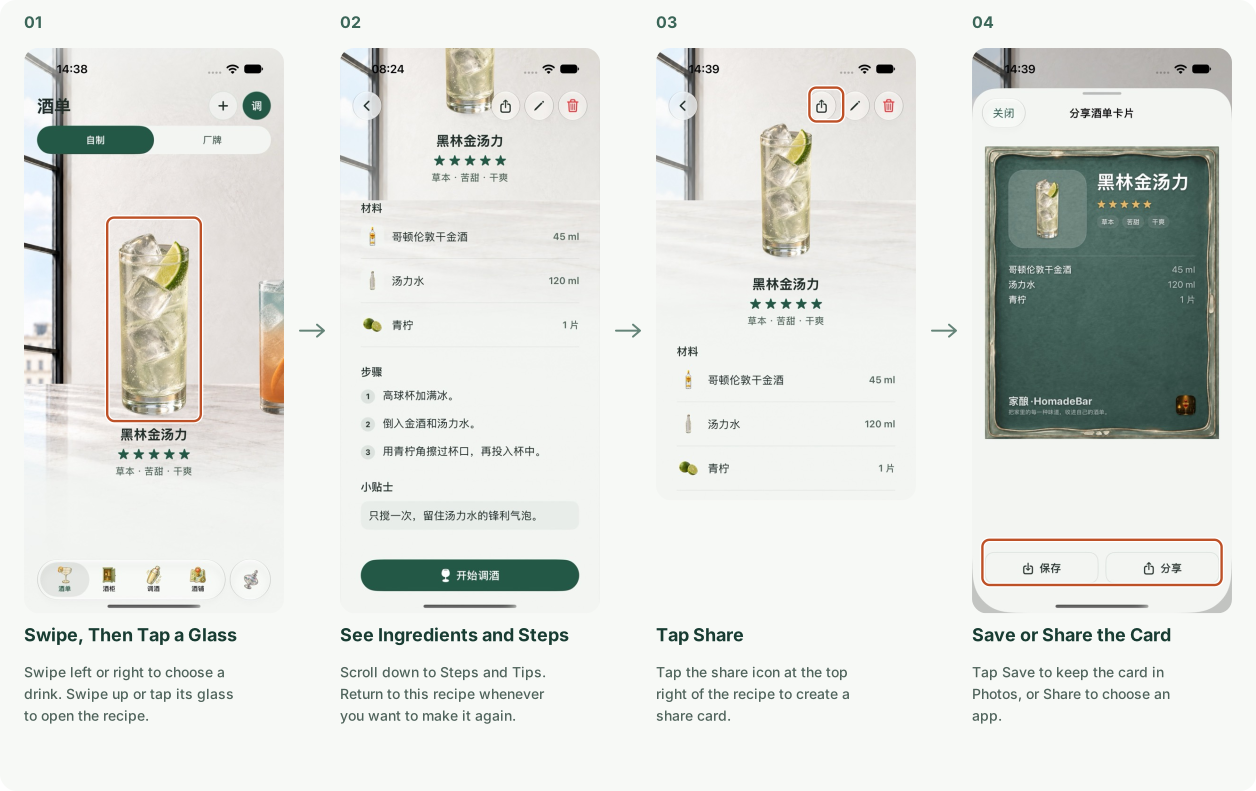
1. Swipe, Then Tap a Glass: Swipe left or right to choose a drink. Swipe up or tap its glass to open the recipe.; 2. See Ingredients and Steps: Scroll down to Steps and Tips. Return to this recipe whenever you want to make it again.; 3. Tap Share: Tap the share icon at the top right of the recipe to create a share card.; 4. Save or Share the Card: Tap Save to keep the card in Photos, or Share to choose an app.

Recipes / Mine

Add, Edit, Delete

Choose an image, name, and flavors, then add ingredients and steps. You can edit or delete the recipe anytime.
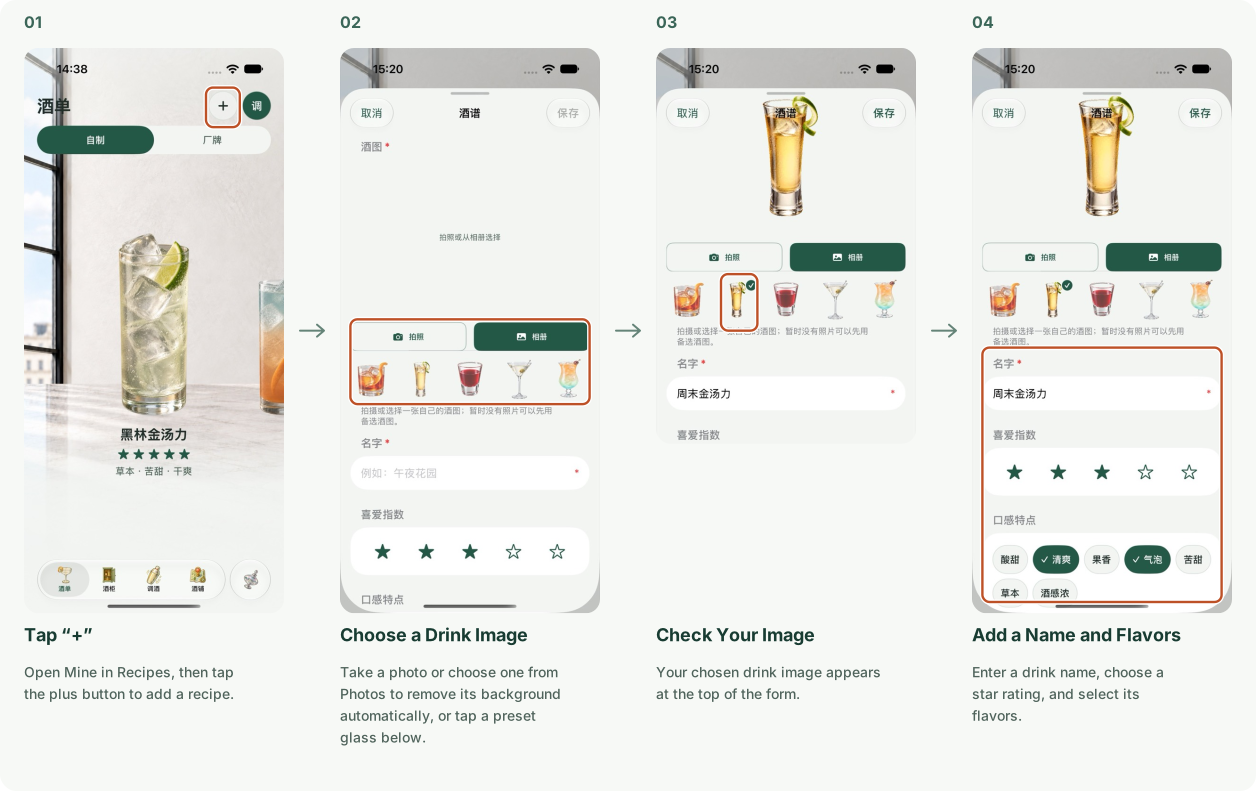
1. Tap “+”: Open Mine in Recipes, then tap the plus button to add a recipe.; 2. Choose a Drink Image: Take a photo or choose one from Photos to remove its background automatically, or tap a preset glass below.; 3. Check Your Image: Your chosen drink image appears at the top of the form.; 4. Add a Name and Flavors: Enter a drink name, choose a star rating, and select its flavors.
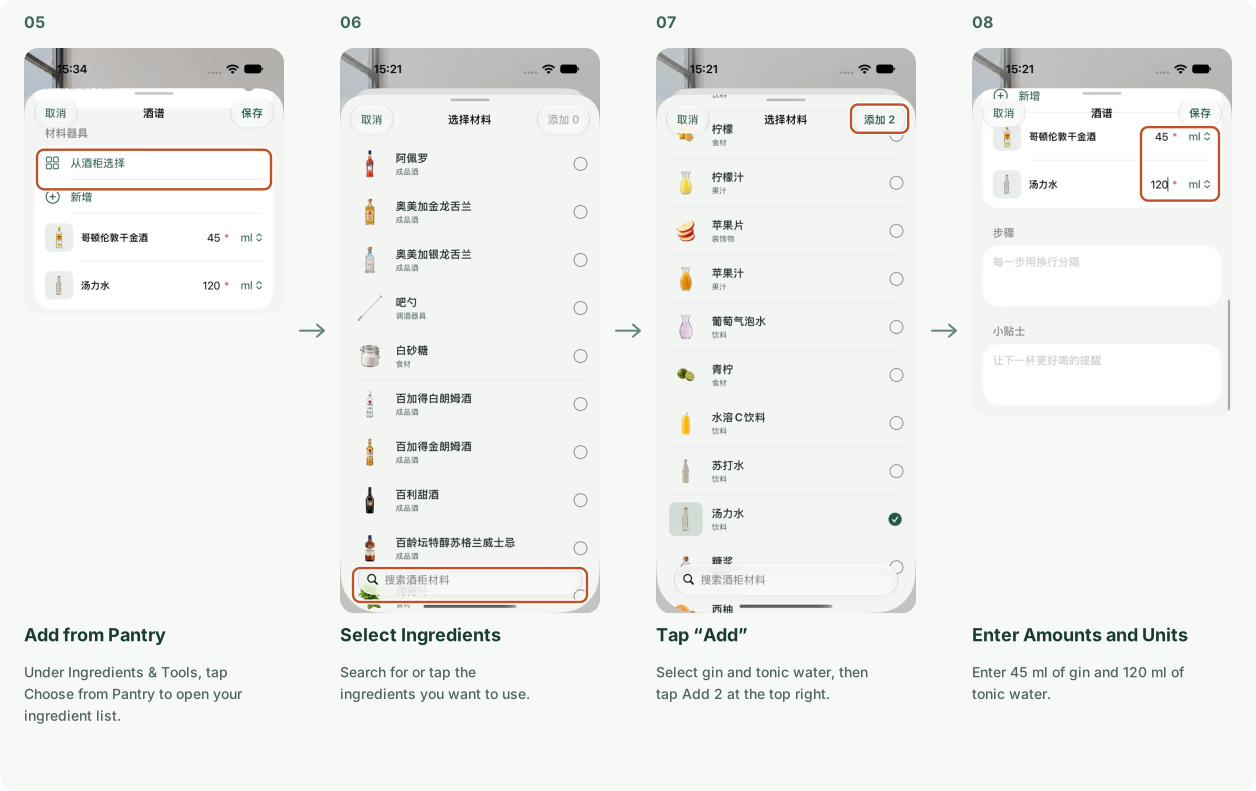
5. Add from Pantry: Under Ingredients & Tools, tap Choose from Pantry to open your ingredient list.; 6. Select Ingredients: Search for or tap the ingredients you want to use.; 7. Tap “Add”: Select gin and tonic water, then tap Add 2 at the top right.; 8. Enter Amounts and Units: Enter 45 ml of gin and 120 ml of tonic water.
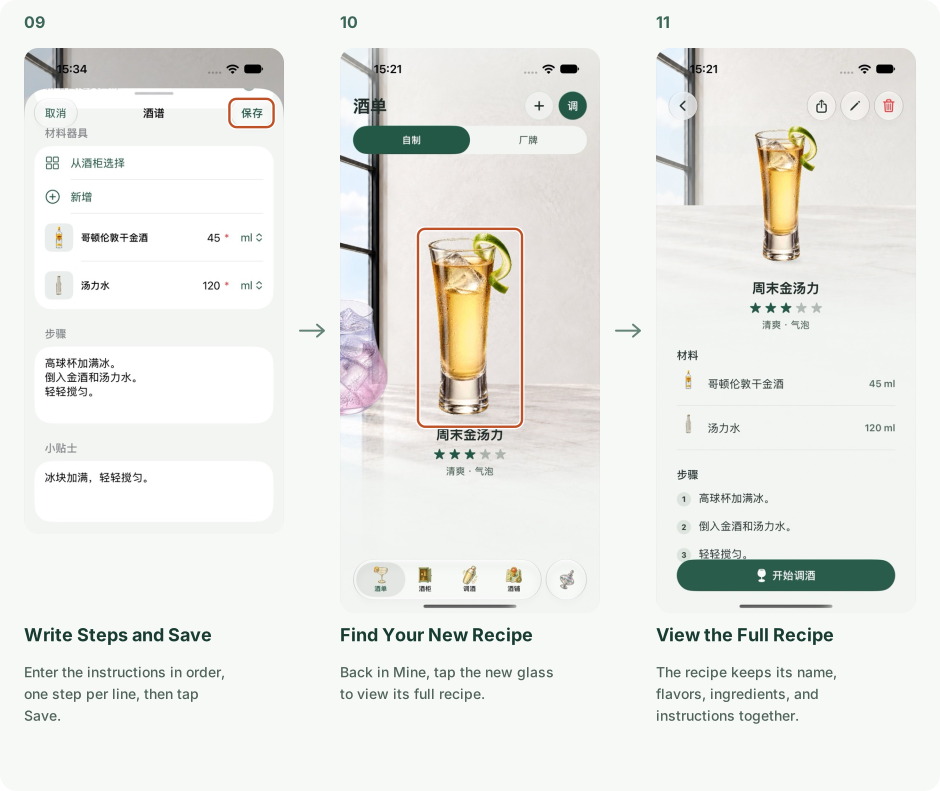
9. Write Steps and Save: Enter the instructions in order, one step per line, then tap Save.; 10. Find Your New Recipe: Back in Mine, tap the new glass to view its full recipe.; 11. View the Full Recipe: The recipe keeps its name, flavors, ingredients, and instructions together.
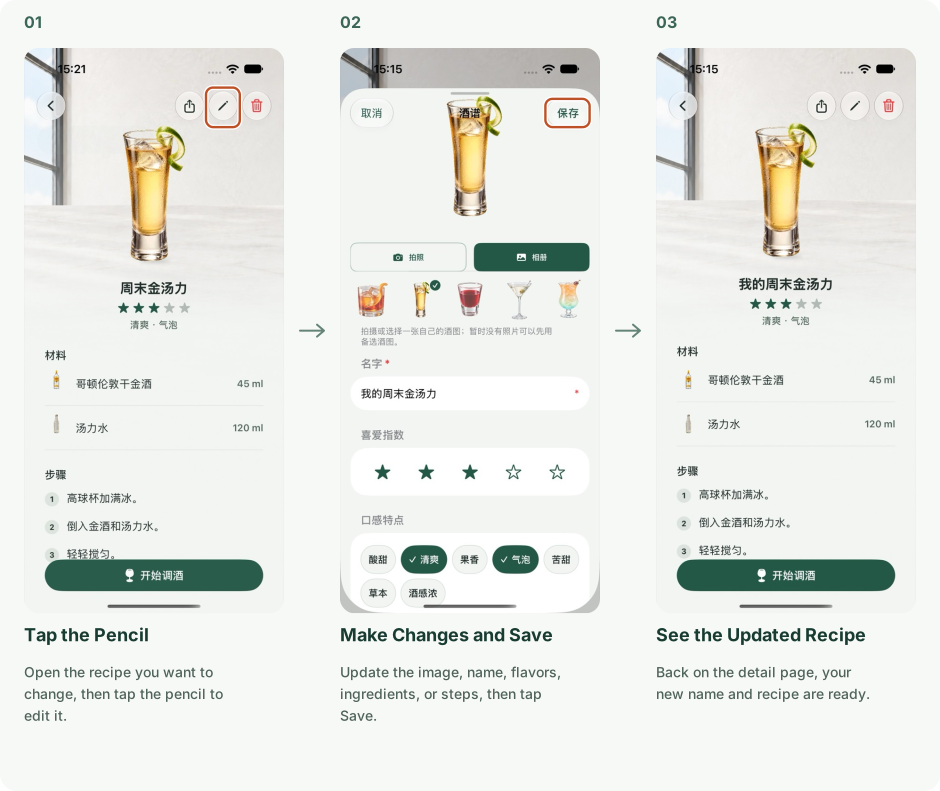
1. Tap the Pencil: Open the recipe you want to change, then tap the pencil to edit it.; 2. Make Changes and Save: Update the image, name, flavors, ingredients, or steps, then tap Save.; 3. See the Updated Recipe: Back on the detail page, your new name and recipe are ready.
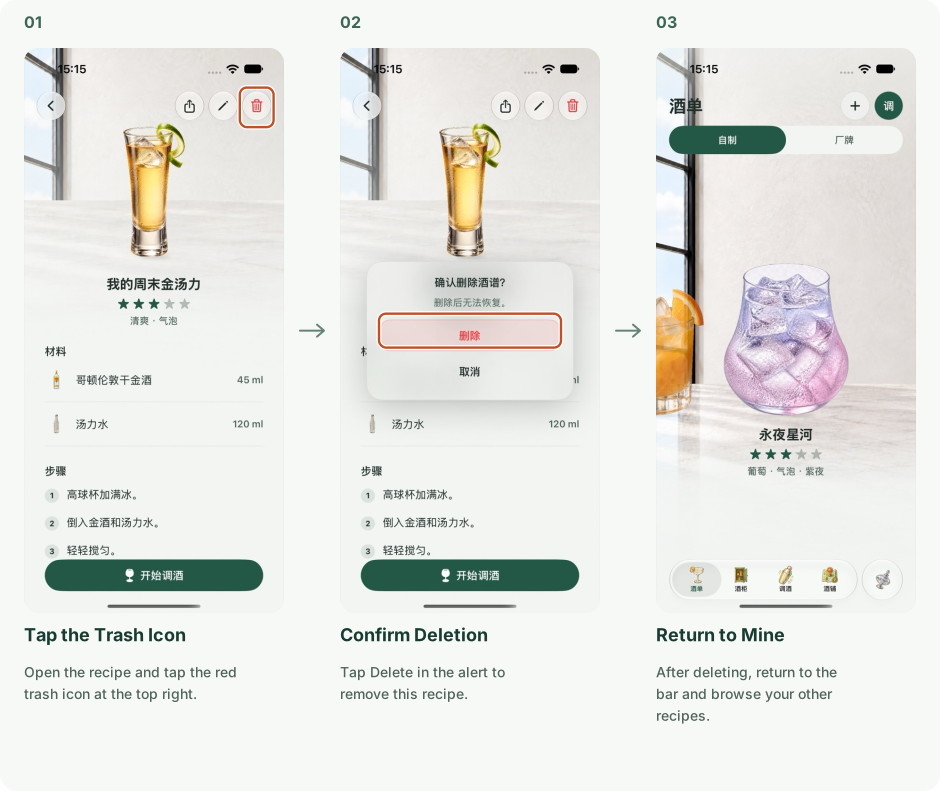
1. Tap the Trash Icon: Open the recipe and tap the red trash icon at the top right.; 2. Confirm Deletion: Tap Delete in the alert to remove this recipe.; 3. Return to Mine: After deleting, return to the bar and browse your other recipes.

Recipes / Mine

Start mixing

Choose how many servings to make, follow every step, then confirm the ingredients used.
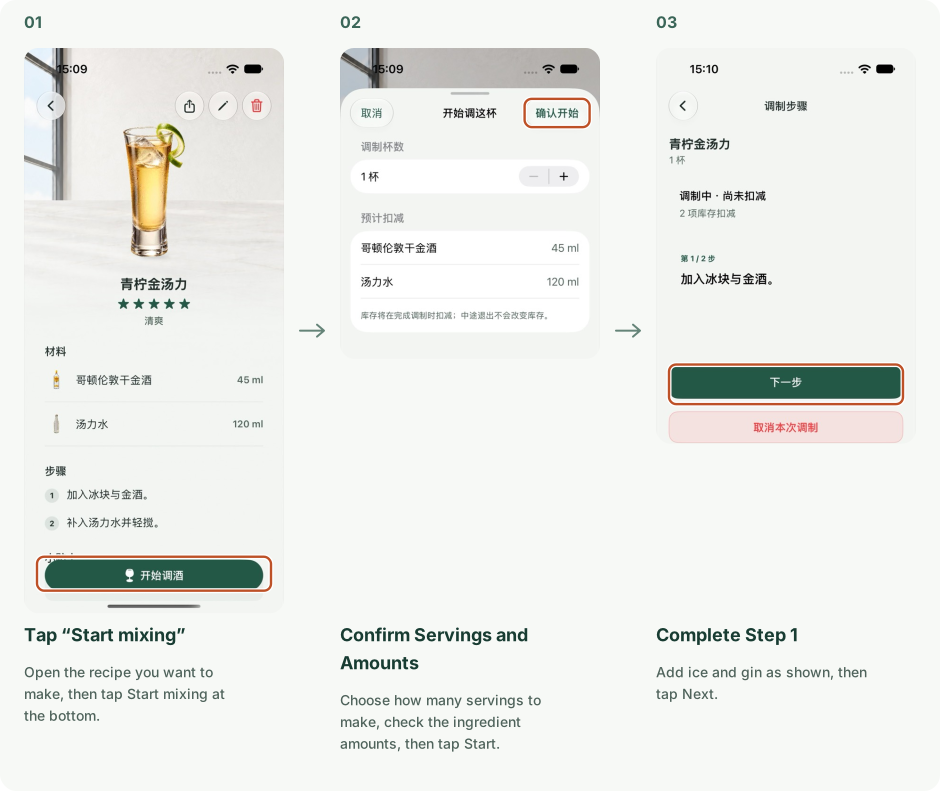
1. Tap “Start mixing”: Open the recipe you want to make, then tap Start mixing at the bottom.; 2. Confirm Servings and Amounts: Choose how many servings to make, check the ingredient amounts, then tap Start.; 3. Complete Step 1: Add ice and gin as shown, then tap Next.
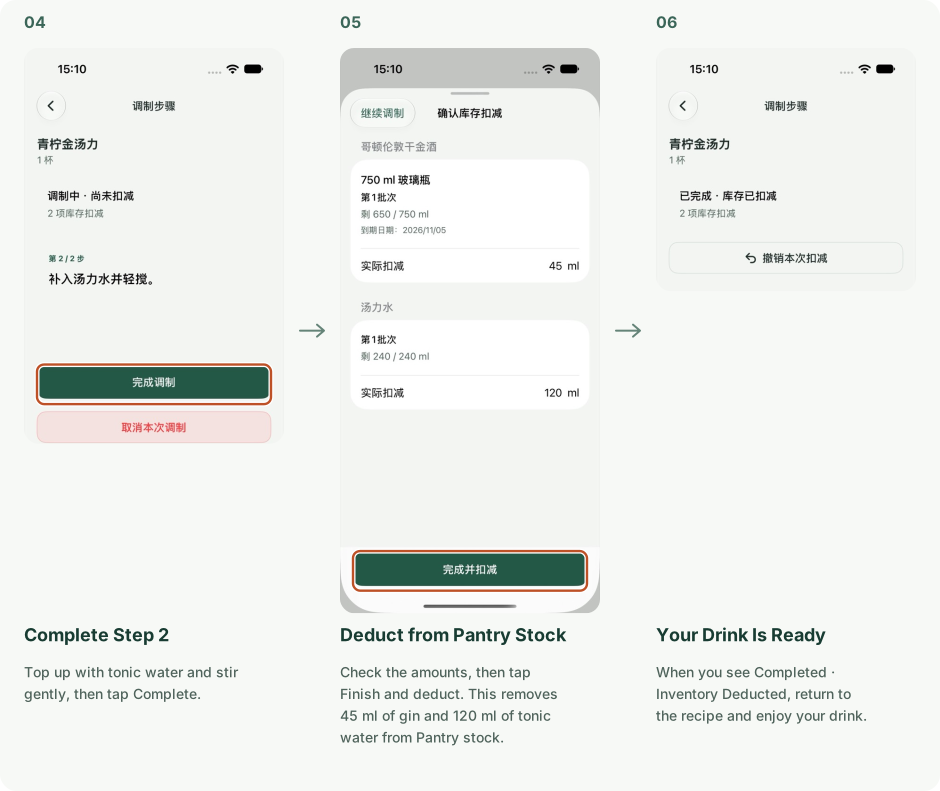
4. Complete Step 2: Top up with tonic water and stir gently, then tap Complete.; 5. Deduct from Pantry Stock: Check the amounts, then tap Finish and deduct. This removes 45 ml of gin and 120 ml of tonic water from Pantry stock.; 6. Your Drink Is Ready: When you see Completed · Inventory Deducted, return to the recipe and enjoy your drink.

Recipes / Brands

Create a Brand, iCloud Sync

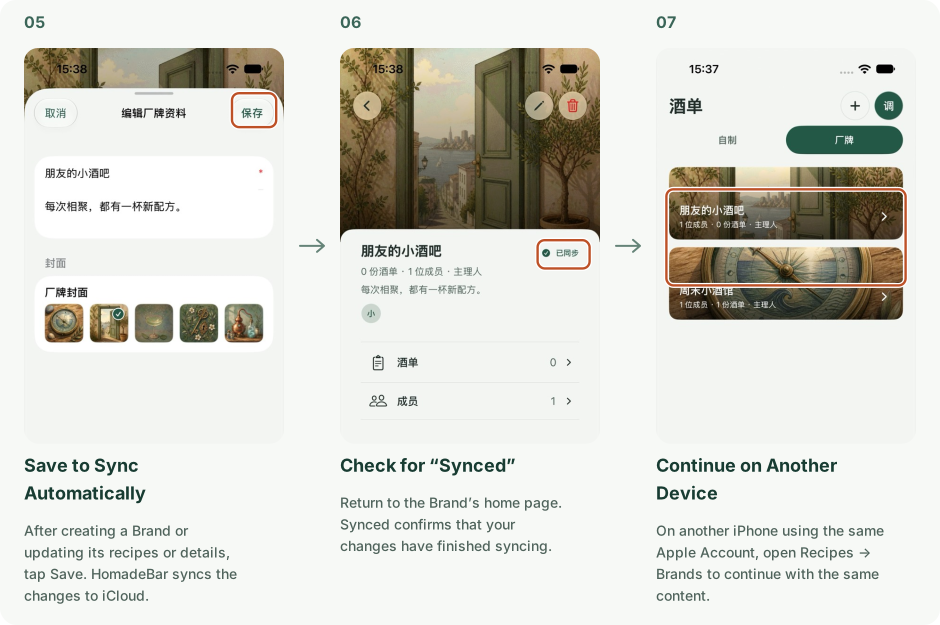
Brands sync automatically through iCloud, independently of your personal sync setting. Once you see “Synced,” your other devices using the same Apple Account and friends who have joined can receive the updates.
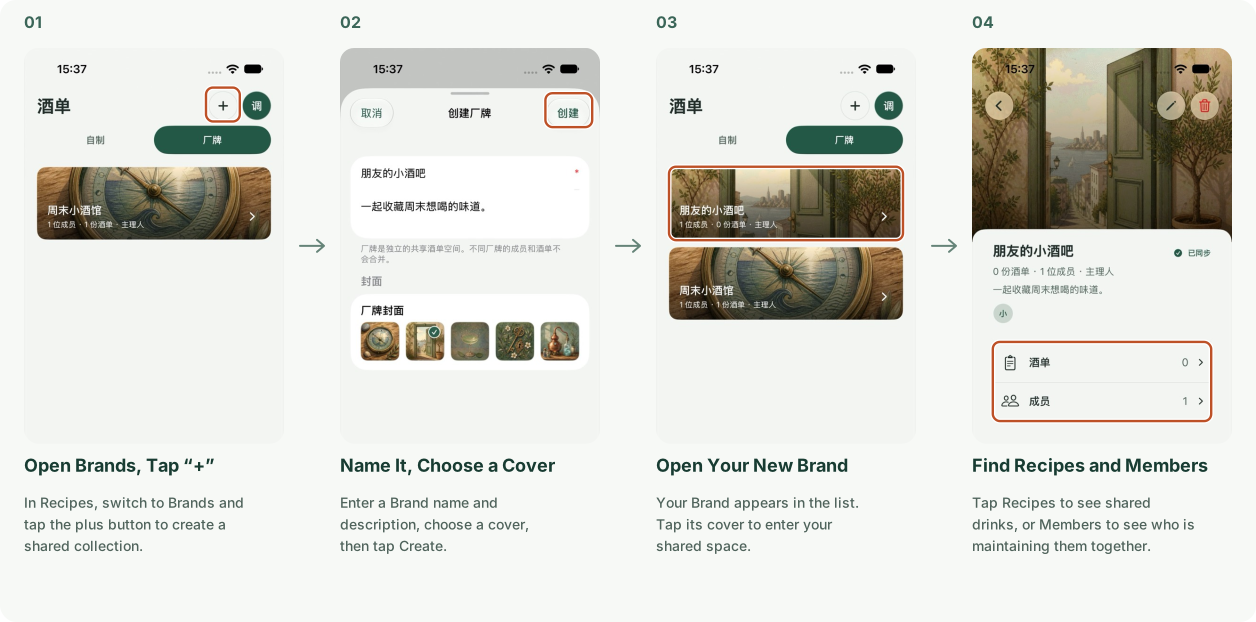
1. Open Brands, Tap “+”: In Recipes, switch to Brands and tap the plus button to create a shared collection.; 2. Name It, Choose a Cover: Enter a Brand name and description, choose a cover, then tap Create.; 3. Open Your New Brand: Your Brand appears in the list. Tap its cover to enter your shared space.; 4. Find Recipes and Members: Tap Recipes to see shared drinks, or Members to see who is maintaining them together.
5. Save to Sync Automatically: After creating a Brand or updating its recipes or details, tap Save. HomadeBar syncs the changes to iCloud.; 6. Check for “Synced”: Return to the Brand’s home page. Synced confirms that your changes have finished syncing.; 7. Continue on Another Device: On another iPhone using the same Apple Account, open Recipes → Brands to continue with the same content.

Recipes / Brands

Add and Use Recipes

Copying creates a separate recipe, even when the name stays the same. Changes to a shared Brand recipe never change your version in Mine, and your own adjustments never change the Brand. Copies back to Mine are independent too.
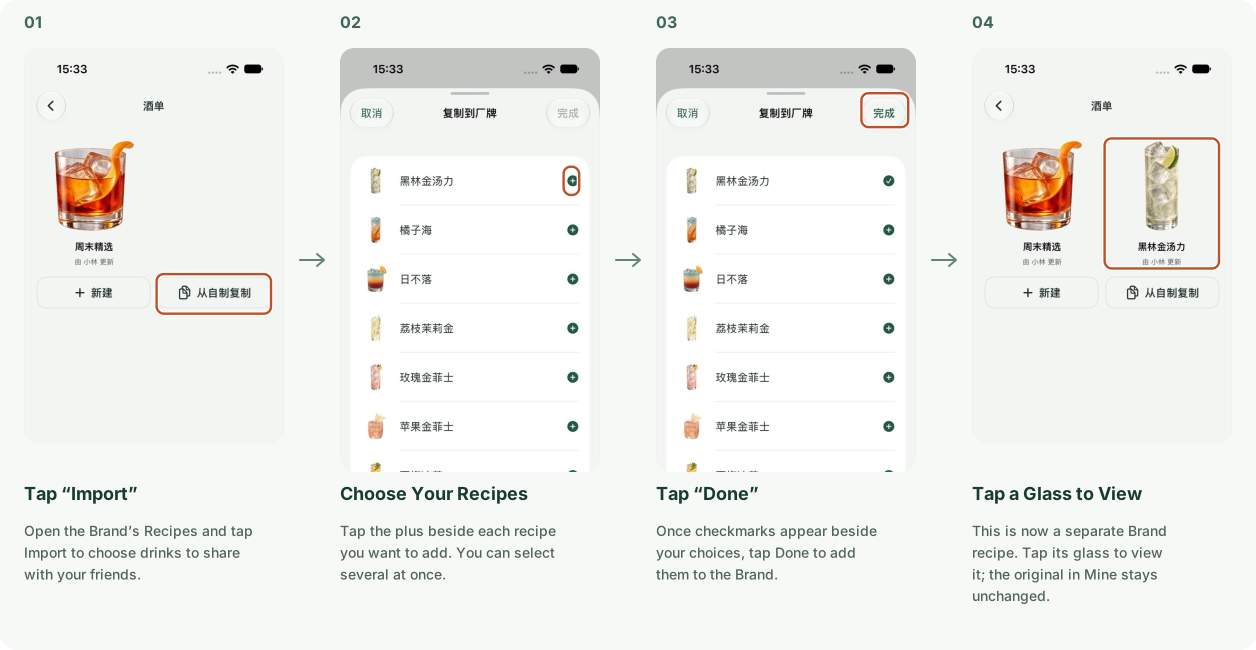
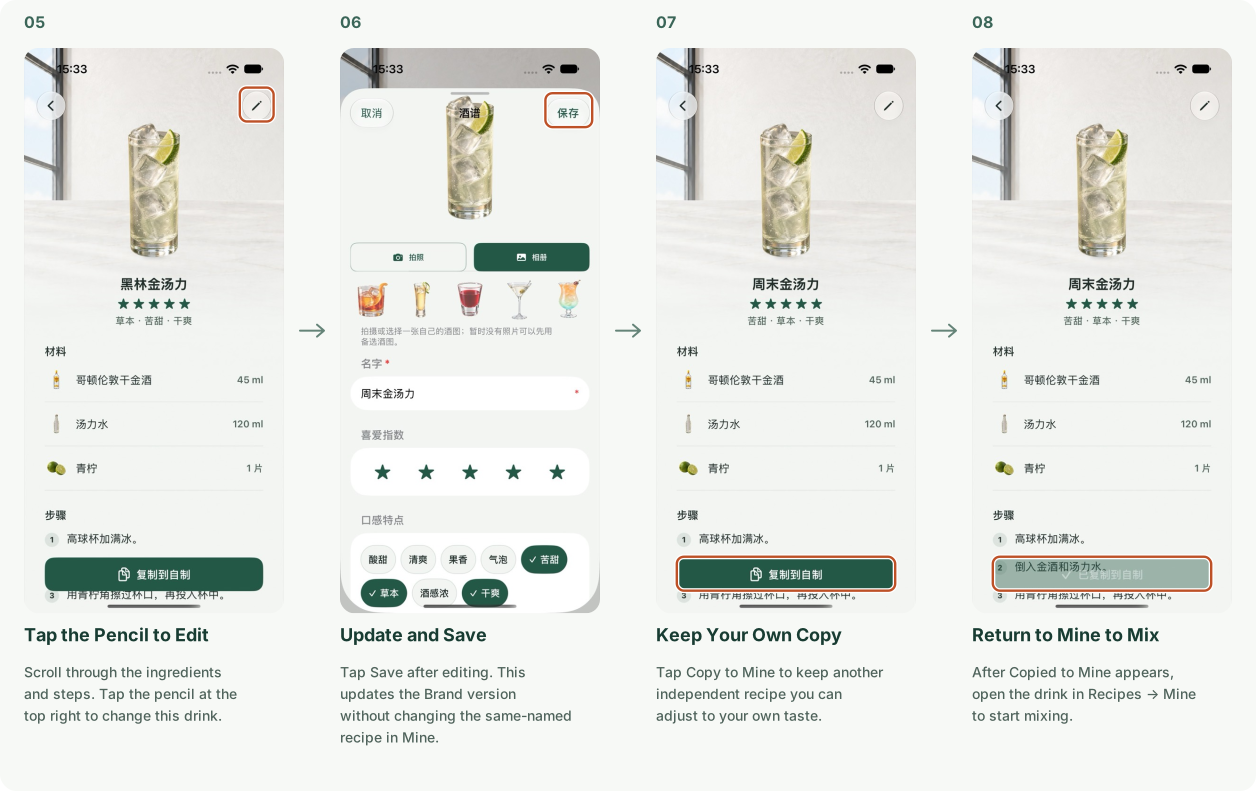
1. Tap “Import”: Open the Brand’s Recipes and tap Import to choose drinks to share with your friends.; 2. Choose Your Recipes: Tap the plus beside each recipe you want to add. You can select several at once.; 3. Tap “Done”: Once checkmarks appear beside your choices, tap Done to add them to the Brand.; 4. Tap a Glass to View: This is now a separate Brand recipe. Tap its glass to view it; the original in Mine stays unchanged.
5. Tap the Pencil to Edit: Scroll through the ingredients and steps. Tap the pencil at the top right to change this drink.; 6. Update and Save: Tap Save after editing. This updates the Brand version without changing the same-named recipe in Mine.; 7. Keep Your Own Copy: Tap Copy to Mine to keep another independent recipe you can adjust to your own taste.; 8. Return to Mine to Mix: After Copied to Mine appears, open the drink in Recipes → Mine to start mixing.

Recipes / Brands

Invite Members, Sharing Permissions

The owner invites friends to view or maintain the Brand together. Each member’s access depends on the sharing permissions the owner gives them.
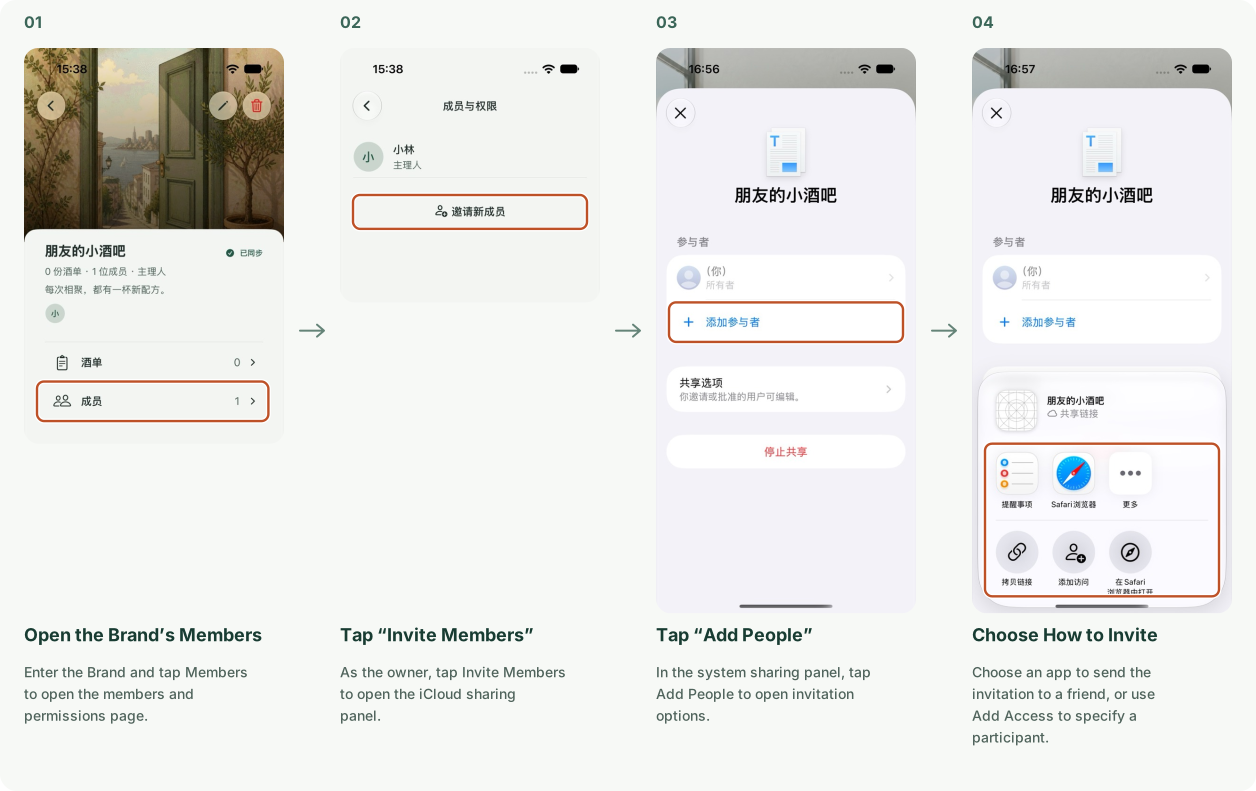
1. Open the Brand’s Members: Enter the Brand and tap Members to open the members and permissions page.; 2. Tap “Invite Members”: As the owner, tap Invite Members to open the iCloud sharing panel.; 3. Tap “Add Participant”: In the system sharing panel, tap Add Participant to open invitation options.; 4. Choose How to Invite: Choose an app to send the invitation to a friend, or use Add Access to specify a participant.
What Each Role Can Do
ActionOwnerCan EditView Only
View Brand recipes✓✓✓
Copy recipes to Mine✓✓✓
Add, edit, or delete Brand recipes✓✓—
Invite members and manage sharing✓——
Edit Brand details or delete the Brand✓——

Pantry / Ingredients, Stock

Browse and Search Ingredients

Keep your spirits, drinks, and ingredients in Pantry and check how much is left.
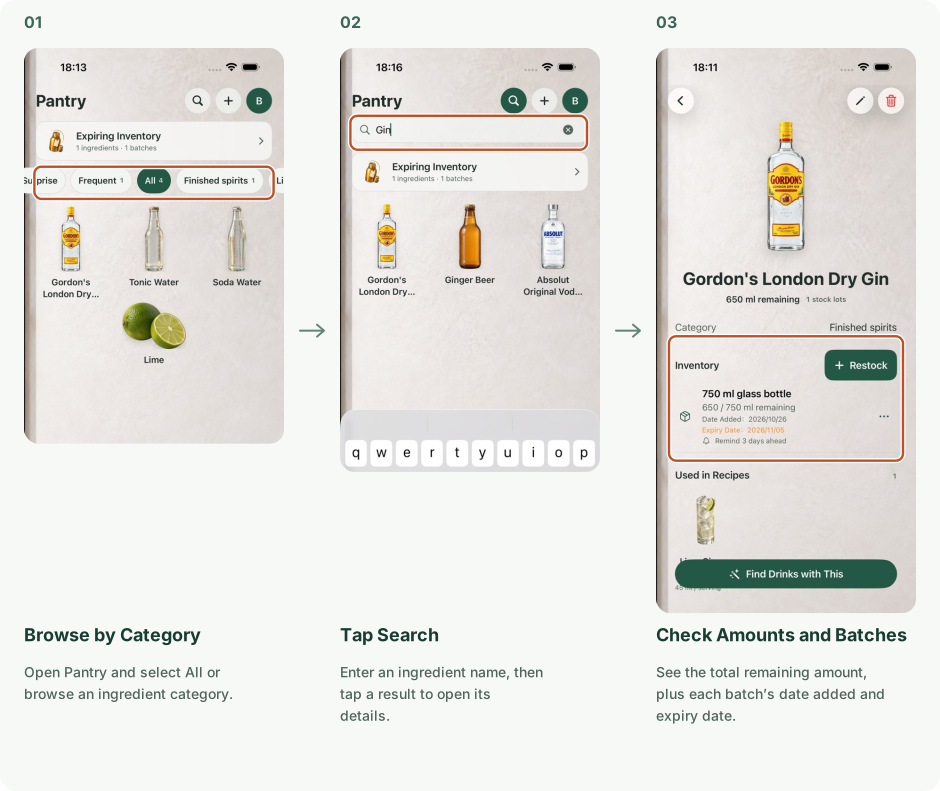
1. Browse by Category: Open Pantry and select All or browse an ingredient category.; 2. Tap Search: Enter an ingredient name, then tap a result to open its details.; 3. Check Amounts and Batches: See the total remaining amount, plus each batch’s date added and expiry date.

Pantry / Ingredients, Stock

Add Ingredients

Add an ingredient’s photo, name, and remaining amount to find recipes and track what you use.
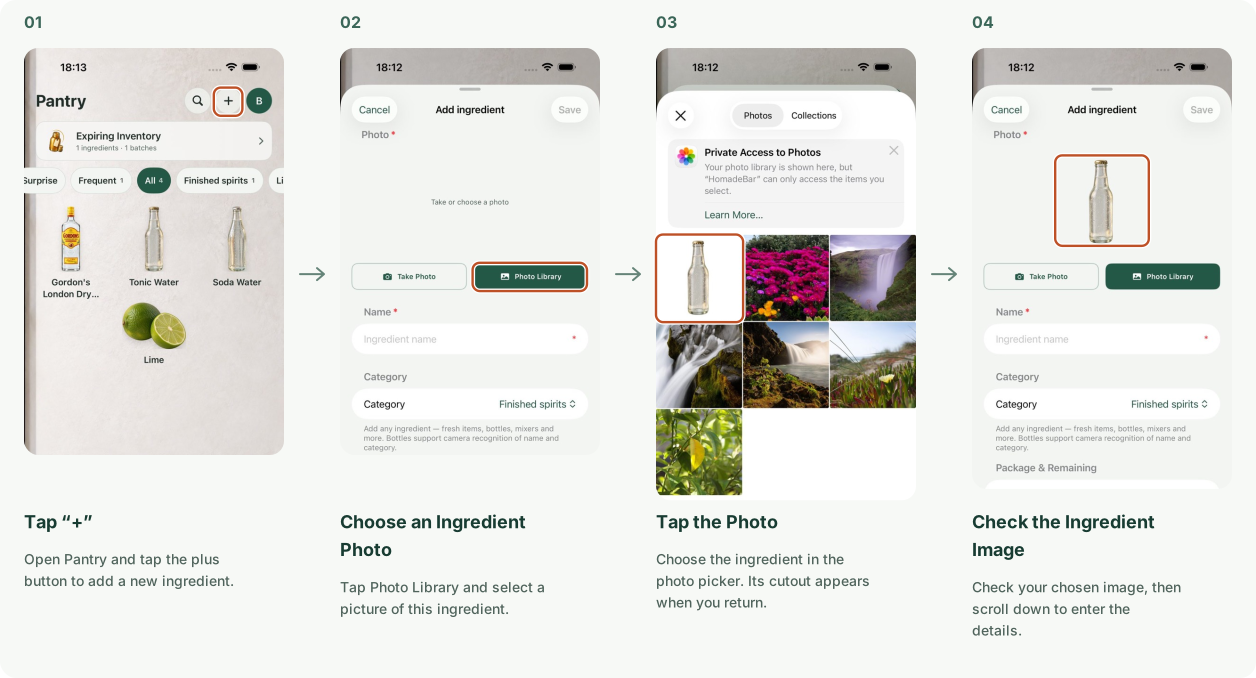
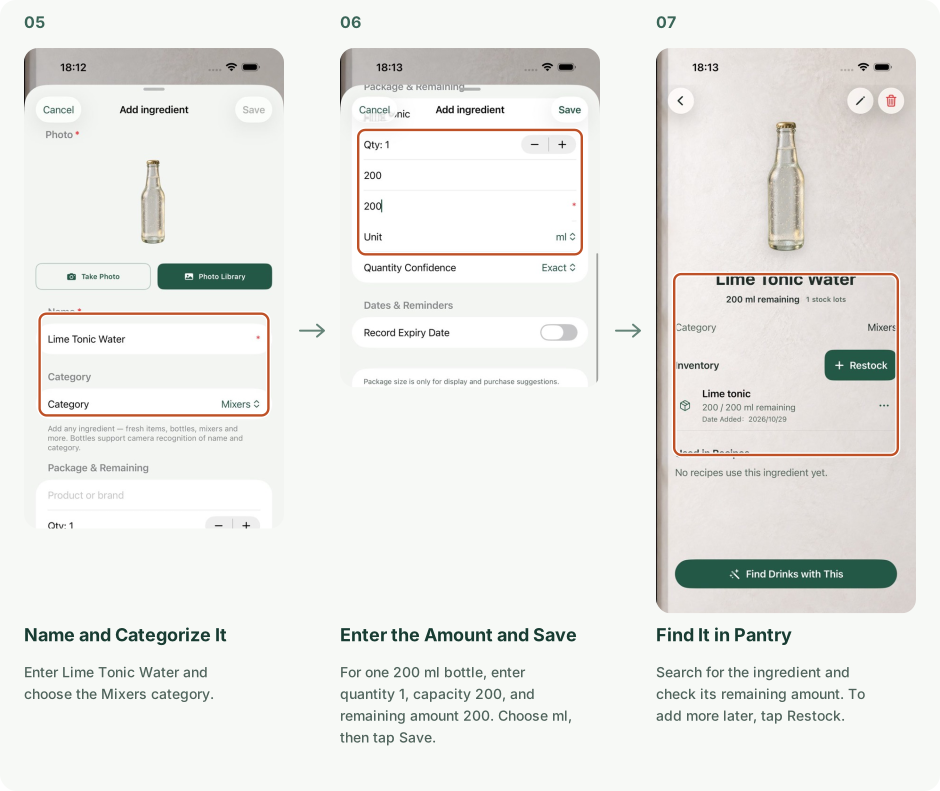
1. Tap “+”: Open Pantry and tap the plus button to add a new ingredient.; 2. Choose an Ingredient Photo: Tap Photo Library and select a picture of this ingredient.; 3. Tap the Photo: Choose the ingredient in the photo picker. Its cutout appears when you return.; 4. Check the Ingredient Image: Check your chosen image, then scroll down to enter the details.
5. Name and Categorize It: Enter Lime Tonic Water and choose the Mixers category.; 6. Enter the Amount and Save: For one 200 ml bottle, enter quantity 1, capacity 200, and remaining amount 200. Choose ml, then tap Save.; 7. Find It in Pantry: Search for the ingredient and check its remaining amount. To add more later, tap Restock.

Pantry / Ingredients, Stock

Restock and Adjust Amounts

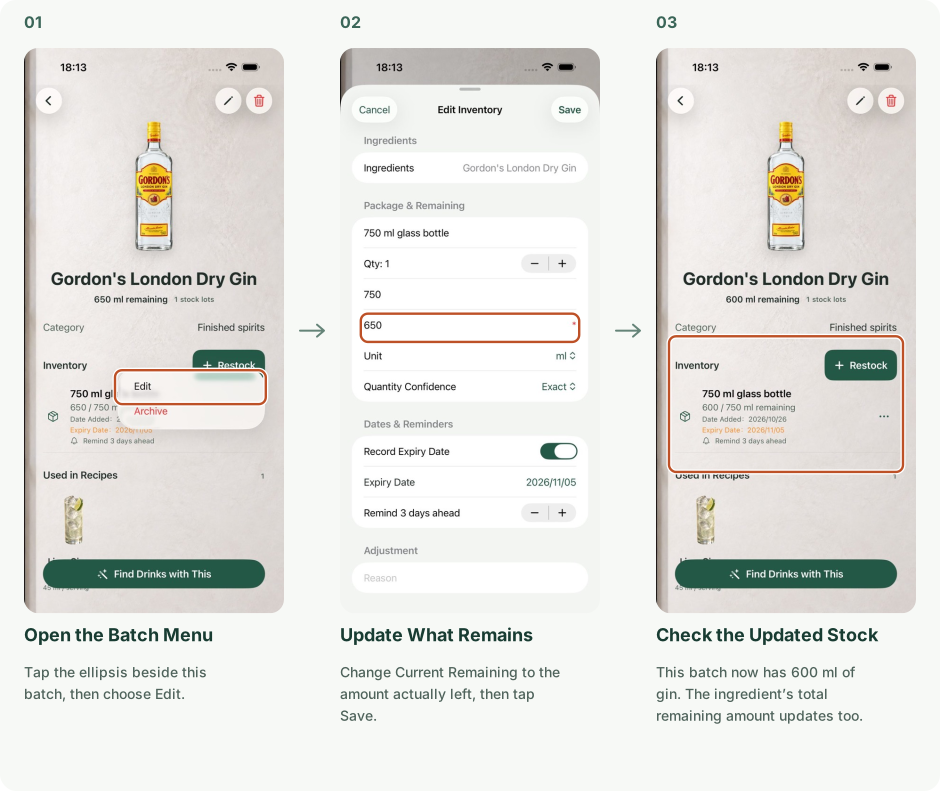
Keep separate batches of the same ingredient. Add a batch when restocking, or edit one to update what remains.
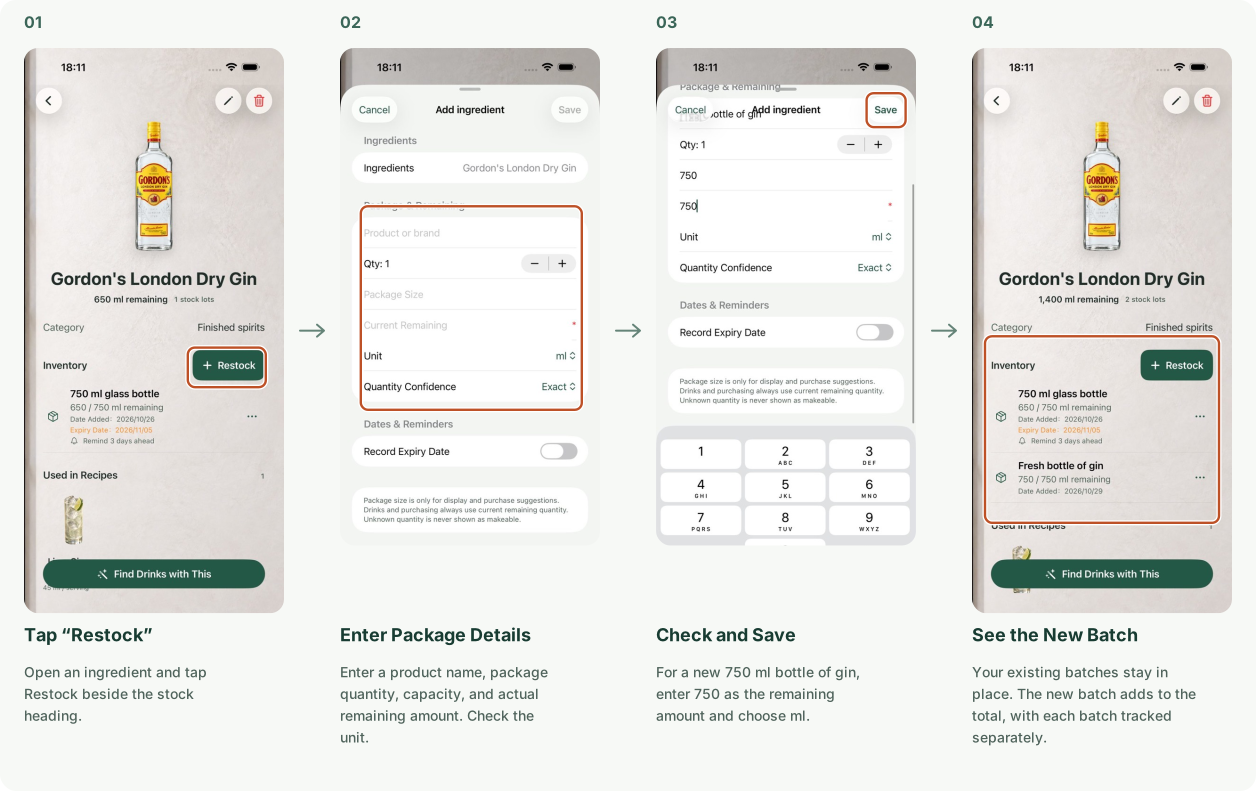
1. Tap “Restock”: Open an ingredient and tap Restock beside the stock heading.; 2. Enter Package Details: Enter a product name, package quantity, capacity, and actual remaining amount. Check the unit.; 3. Check and Save: For a new 750 ml bottle of gin, enter 750 as the remaining amount and choose ml.; 4. See the New Batch: Your existing batches stay in place. The new batch adds to the total, with each batch tracked separately.
1. Open the Batch Menu: Tap the ellipsis beside this batch, then choose Edit.; 2. Update What Remains: Change Current Remaining to the amount actually left, then tap Save.; 3. Check the Updated Stock: This batch now has 600 ml of gin. The ingredient’s total remaining amount updates too.

Pantry / Expiry Reminders

Expiry Dates, Reminders

Record the expiry date on each package and see expiring stock together in Pantry.
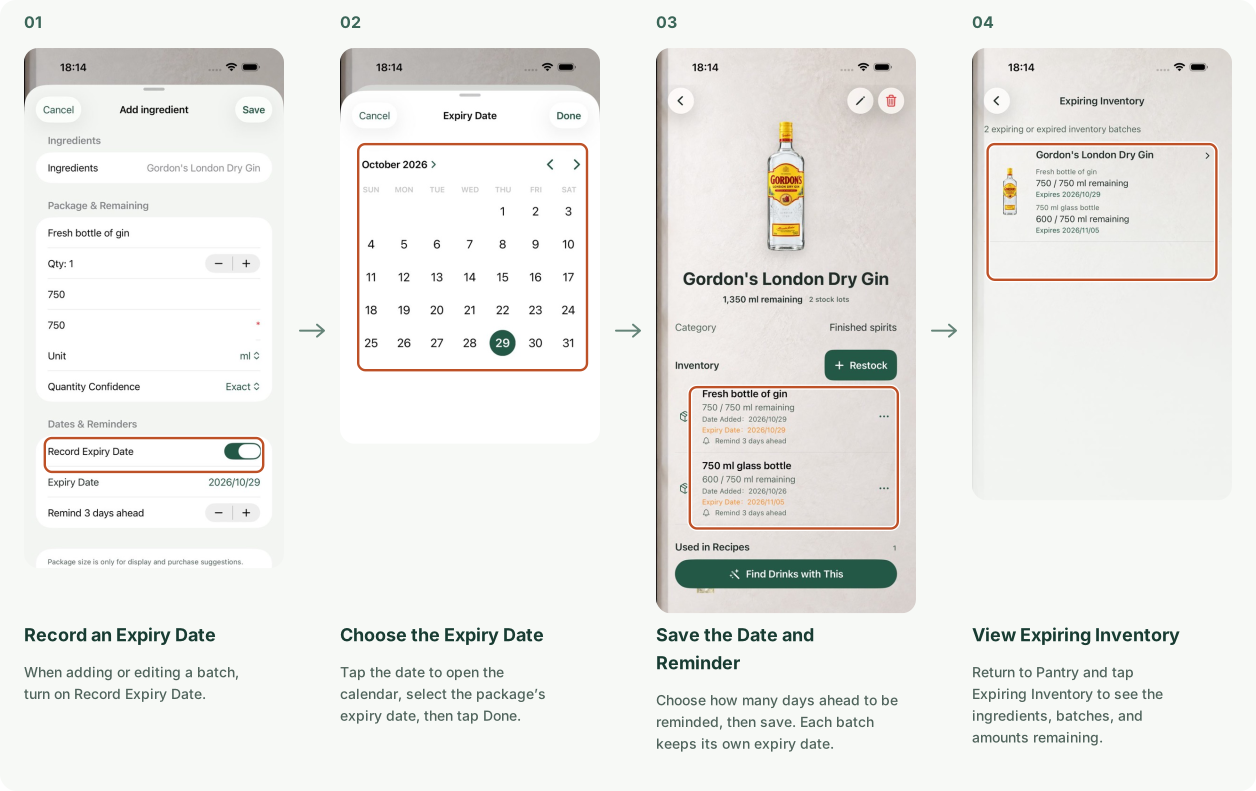
1. Record an Expiry Date: When adding or editing a batch, turn on Record Expiry Date.; 2. Choose the Expiry Date: Tap the date to open the calendar, select the package’s expiry date, then tap Done.; 3. Save the Date and Reminder: Choose how many days ahead to be reminded, then save. Each batch keeps its own expiry date.; 4. View Expiring Inventory: Return to Pantry and tap Expiring Inventory to see the ingredients, batches, and amounts remaining.

Mix / Choose a Drink

Choose by Flavor

Pick the flavors you feel like, then browse matching recipes.
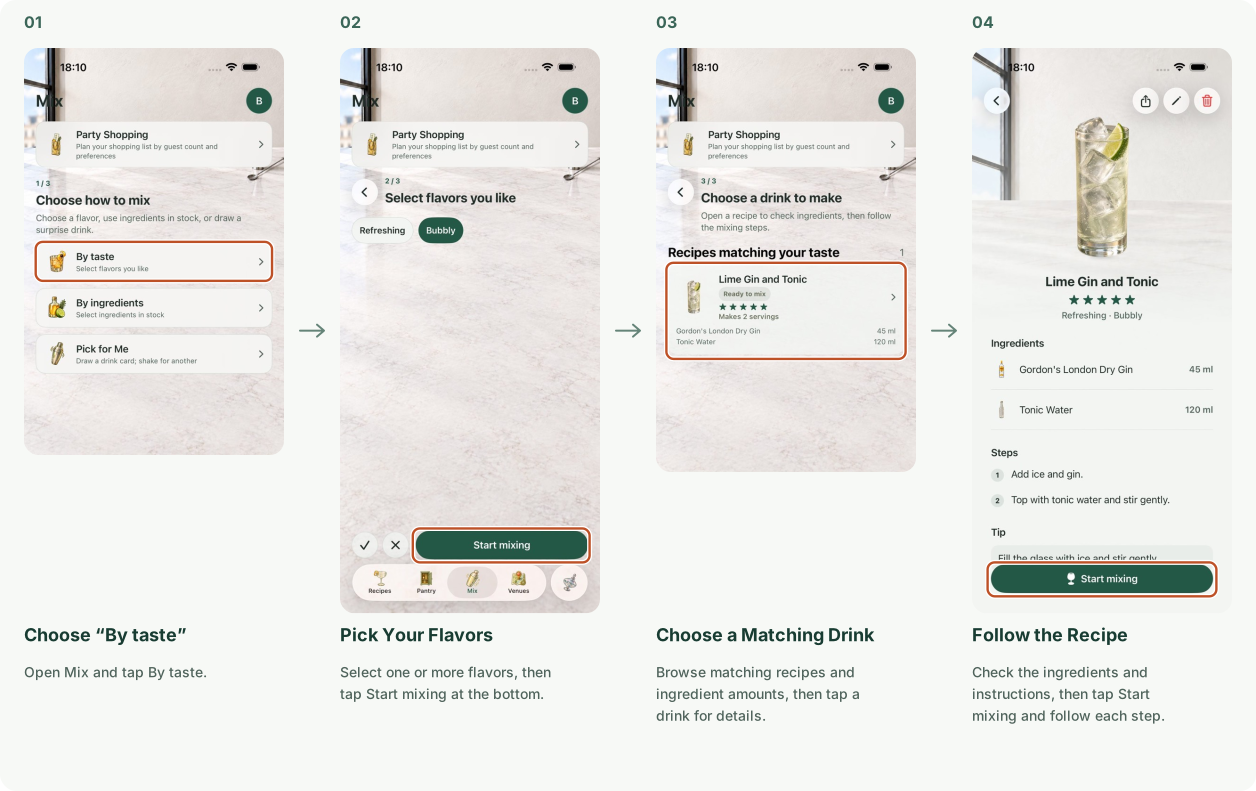
1. Choose “By taste”: Open Mix and tap By taste.; 2. Pick Your Flavors: Select one or more flavors, then tap Start mixing at the bottom.; 3. Choose a Matching Drink: Browse matching recipes and ingredient amounts, then tap a drink for details.; 4. Follow the Recipe: Check the ingredients and instructions, then tap Start mixing and follow each step.

Mix / Choose a Drink

Choose by Ingredient

Select the ingredients you want to use and find a drink to make now.
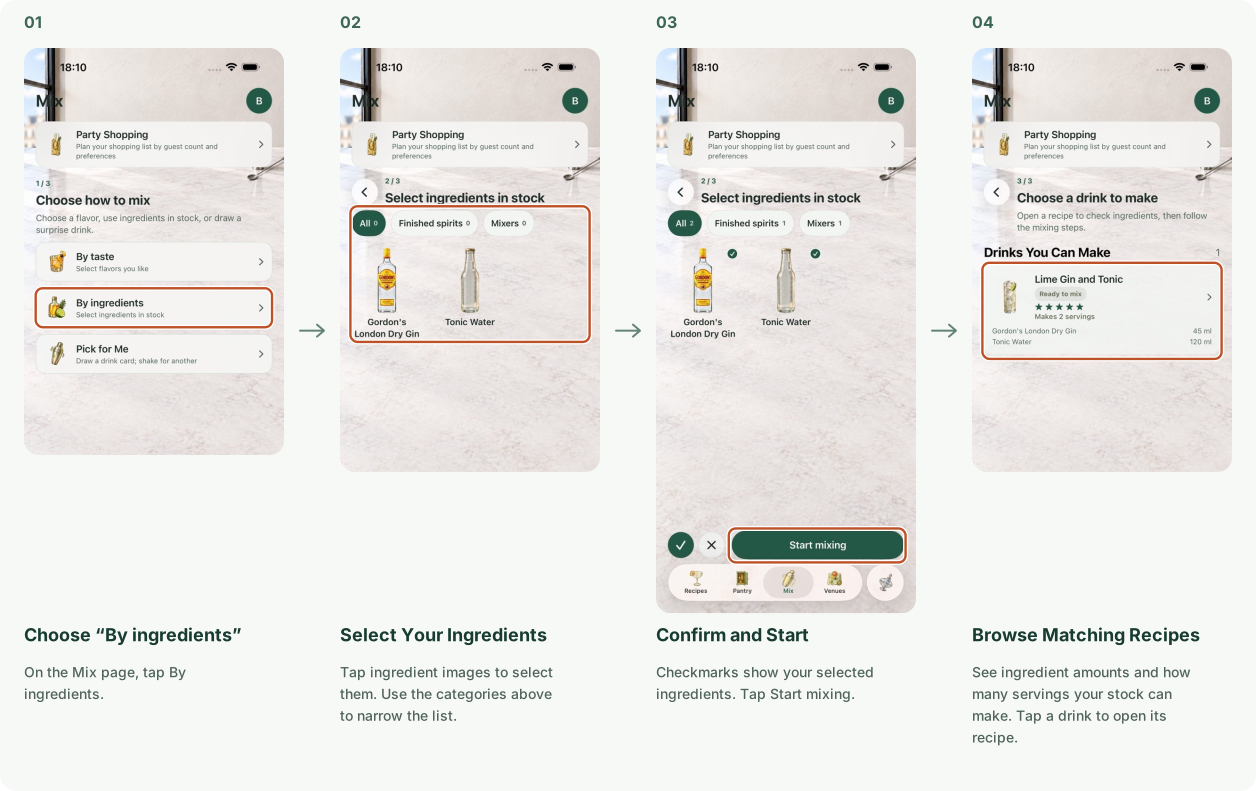
1. Choose “By ingredients”: On the Mix page, tap By ingredients.; 2. Select Your Ingredients: Tap ingredient images to select them. Use the categories above to narrow the list.; 3. Confirm and Start: Checkmarks show your selected ingredients. Tap Start mixing.; 4. Browse Matching Recipes: See ingredient amounts and how many servings your stock can make. Tap a drink to open its recipe.

Mix / Choose a Drink

Pick for Me

Let a recipe card pick your next drink when you need inspiration.
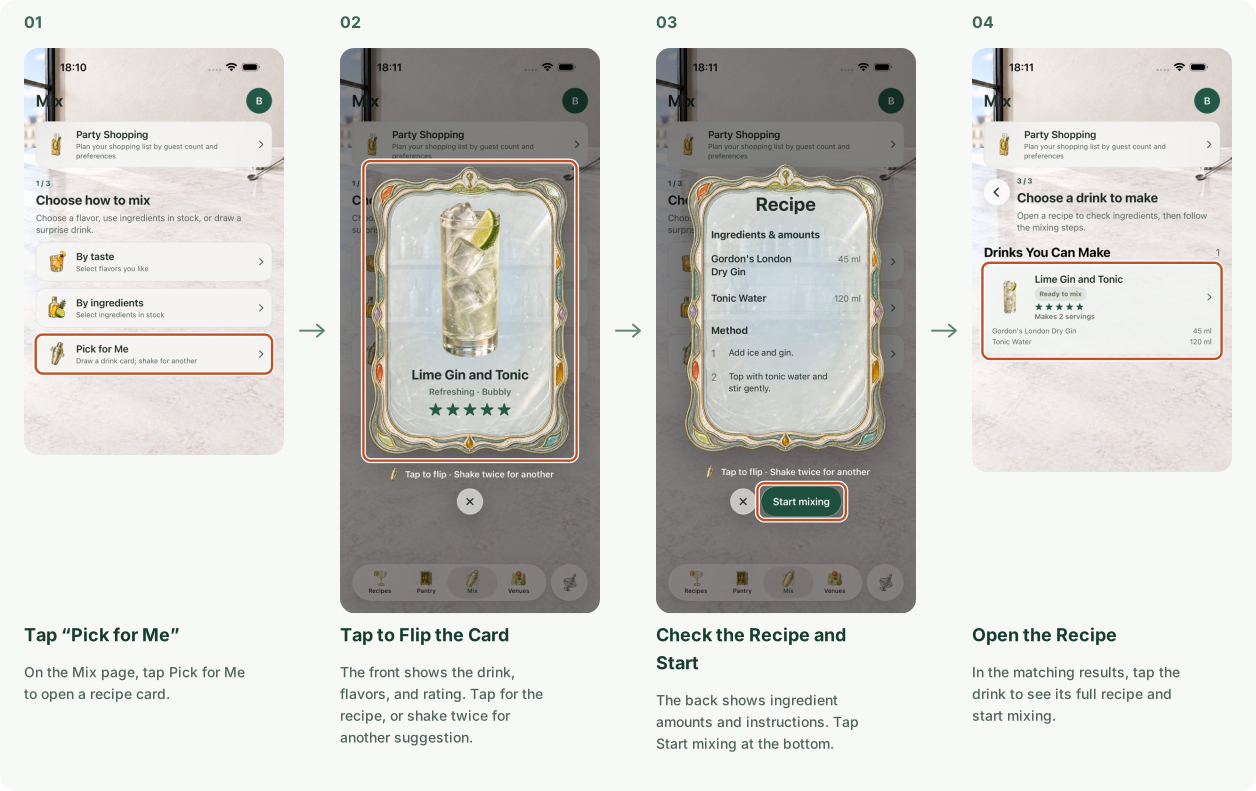
1. Tap “Pick for Me”: On the Mix page, tap Pick for Me to open a recipe card.; 2. Tap to Flip the Card: The front shows the drink, flavors, and rating. Tap for the recipe, or shake twice for another suggestion.; 3. Check the Recipe and Start: The back shows ingredient amounts and instructions. Tap Start mixing at the bottom.; 4. Open the Recipe: In the matching results, tap the drink to see its full recipe and start mixing.

Mix / Party Shopping

Create a Party, Plan Supplies

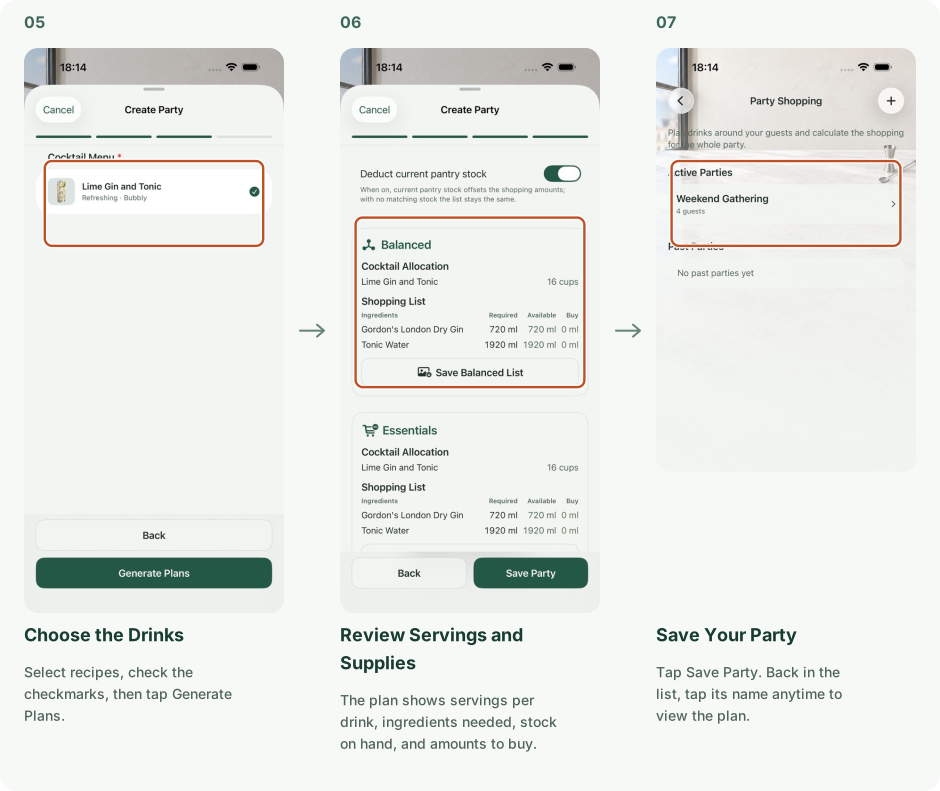
Enter guest numbers and drinking preferences, choose recipes, and build a supply plan for your gathering.
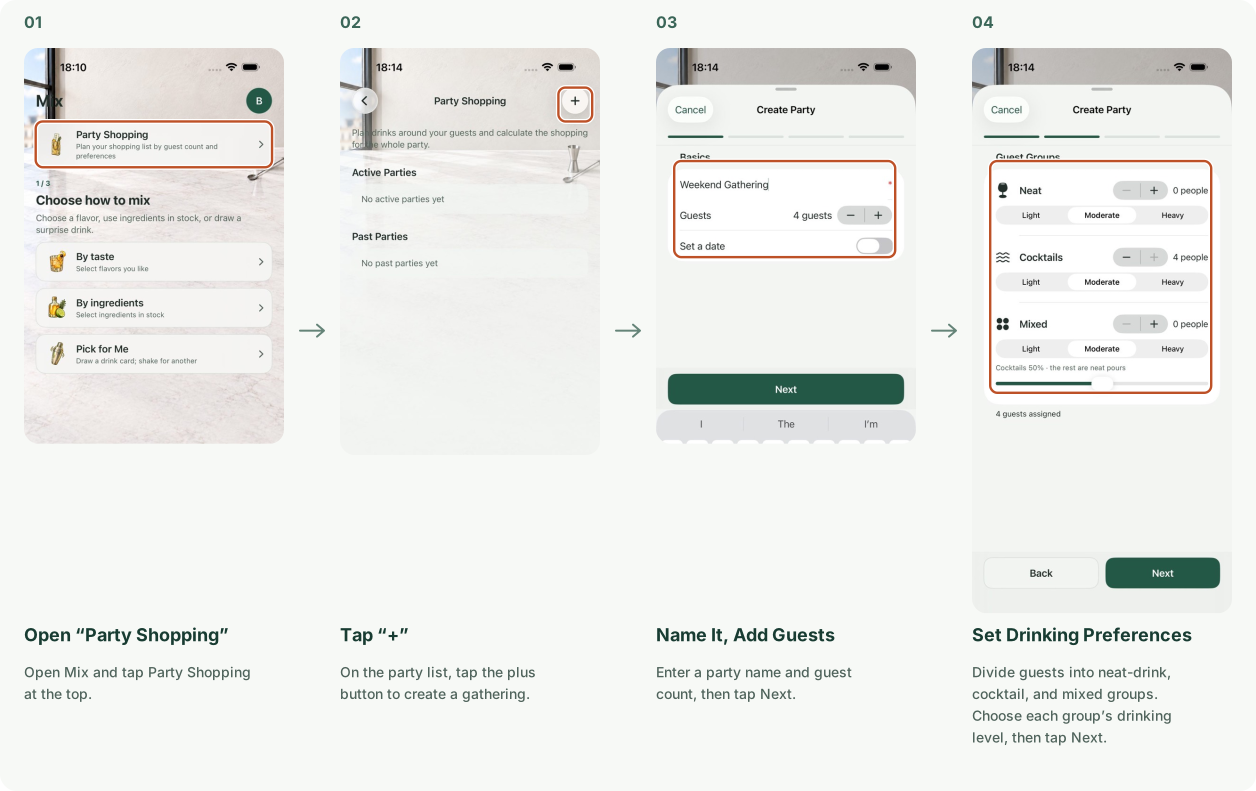
1. Open “Party Shopping”: Open Mix and tap Party Shopping at the top.; 2. Tap “+”: On the party list, tap the plus button to create a gathering.; 3. Name It, Add Guests: Enter a party name and guest count, then tap Next.; 4. Set Drinking Preferences: Divide guests into neat-drink, cocktail, and mixed groups. Choose each group’s drinking level, then tap Next.
5. Choose the Drinks: Select recipes, check the checkmarks, then tap Generate Plans.; 6. Review Servings and Supplies: The plan shows servings per drink, ingredients needed, stock on hand, and amounts to buy.; 7. Save Your Party: Tap Save Party. Back in the list, tap its name anytime to view the plan.

Mix / Party Shopping

View the List, Finish a Party

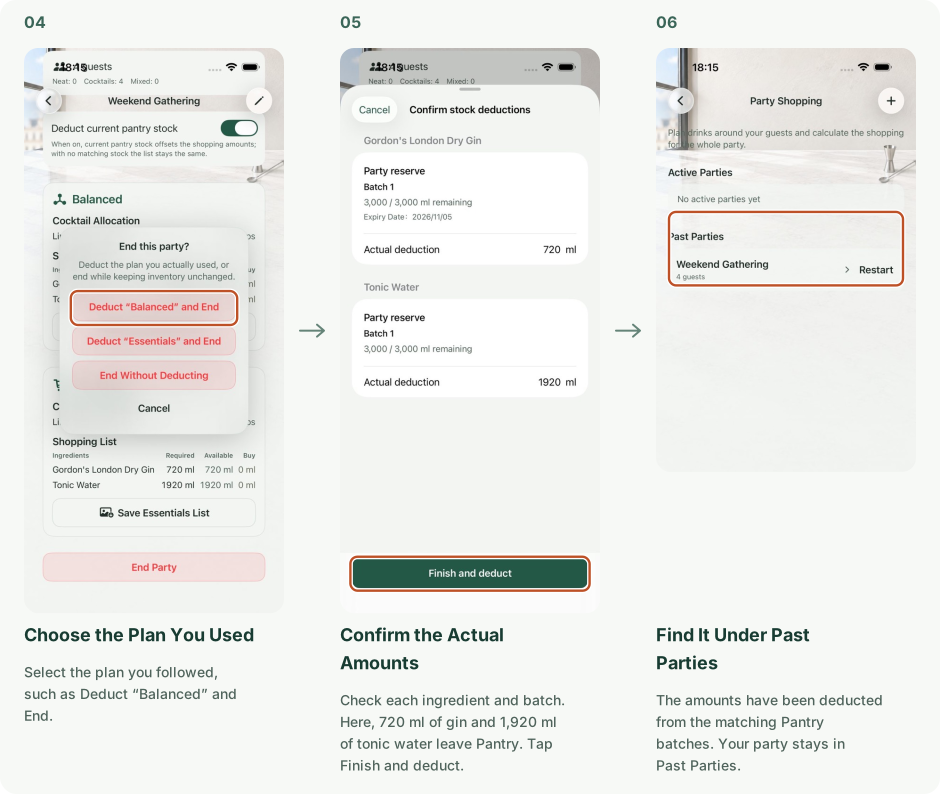
Prepare supplies from your chosen plan. After the party, confirm what you used and deduct it from Pantry stock.
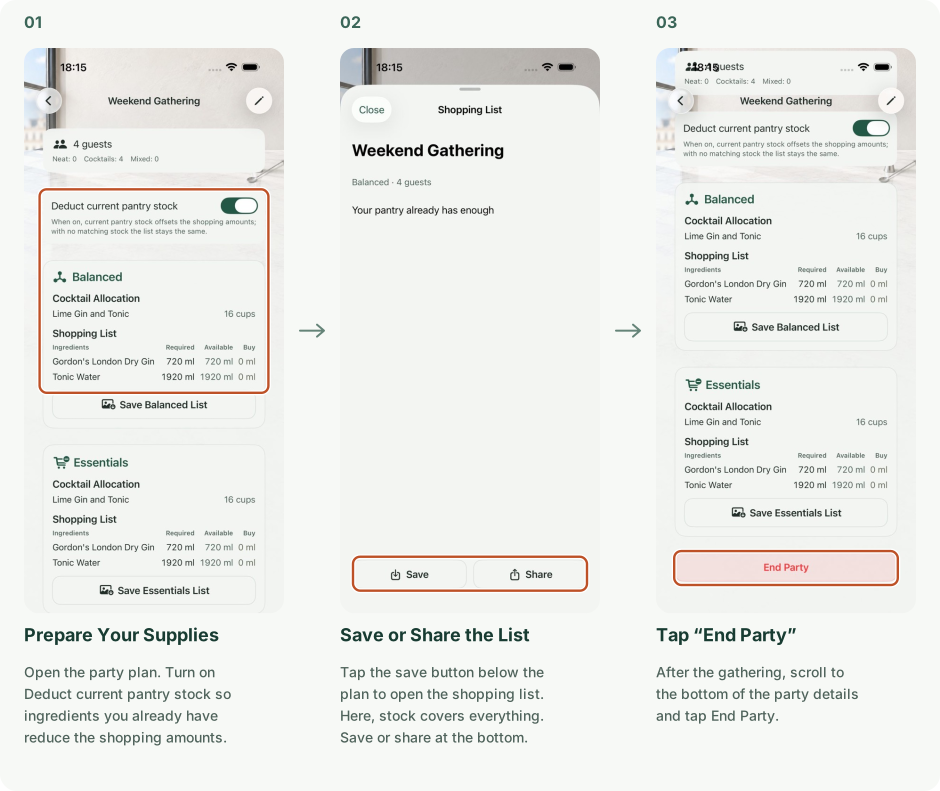
1. Prepare Your Supplies: Open the party plan. Turn on Deduct current pantry stock so ingredients you already have reduce the shopping amounts.; 2. Save or Share the List: Tap the save button below the plan to open the shopping list. Here, stock covers everything. Save or share at the bottom.; 3. Tap “End Party”: After the gathering, scroll to the bottom of the party details and tap End Party.
4. Choose the Plan You Used: Select the plan you followed, such as Deduct “Balanced” and End.; 5. Confirm the Actual Amounts: Check each ingredient and batch. Here, 720 ml of gin and 1,920 ml of tonic water leave Pantry. Tap Finish and deduct.; 6. Find It Under Past Parties: The amounts have been deducted from the matching Pantry batches. Your party stays in Past Parties.

Venues

Find a Bar

Find a place to visit, check its location, and record the drinks you try.
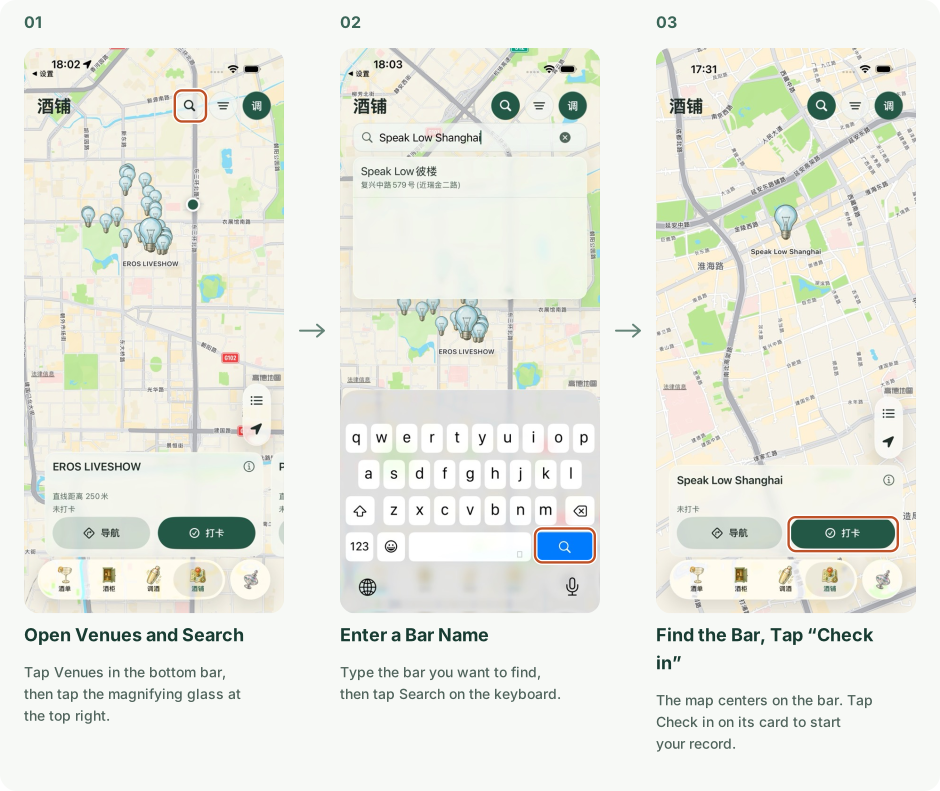
1. Open Venues and Search: Tap Venues in the bottom bar, then tap the magnifying glass at the top right.; 2. Enter a Bar Name: Type the bar you want to find, then tap Search on the keyboard.; 3. Find the Bar, Tap “Check in”: The map centers on the bar. Tap Check in on its card to start your record.

Venues

Record Your Drinks

Save each drink’s name, flavors, photos, and your impressions with the bar you visited.
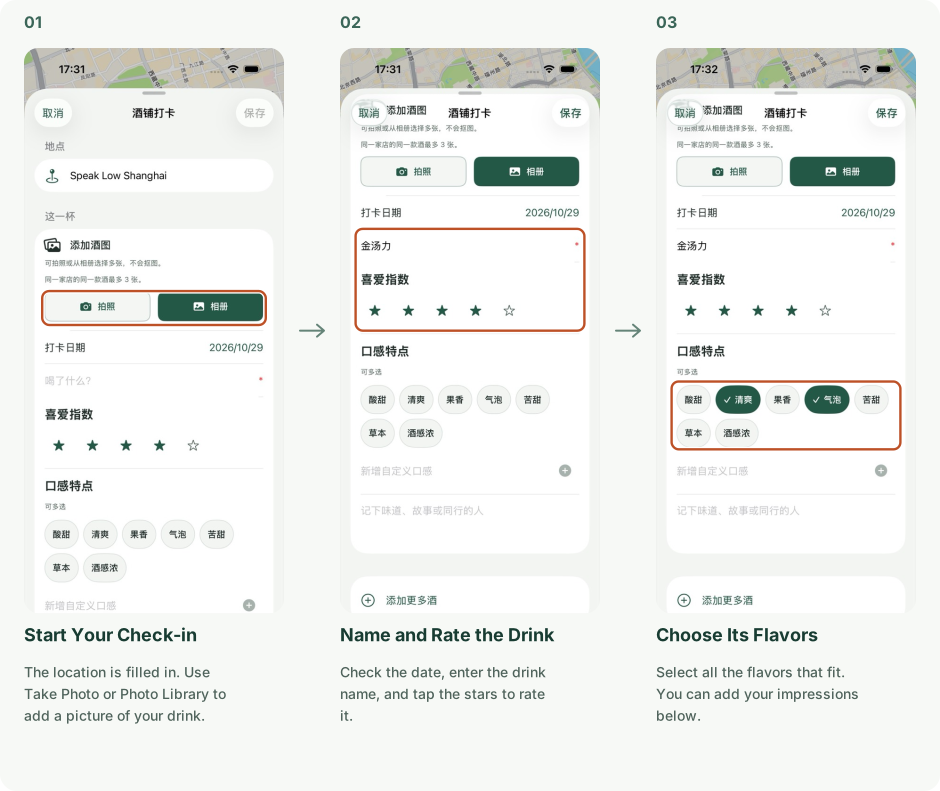
1. Start Your Check-in: The location is filled in. Use Take Photo or Photo Library to add a picture of your drink.; 2. Name and Rate the Drink: Check the date, enter the drink name, and tap the stars to rate it.; 3. Choose Its Flavors: Select all the flavors that fit. You can add your impressions below.
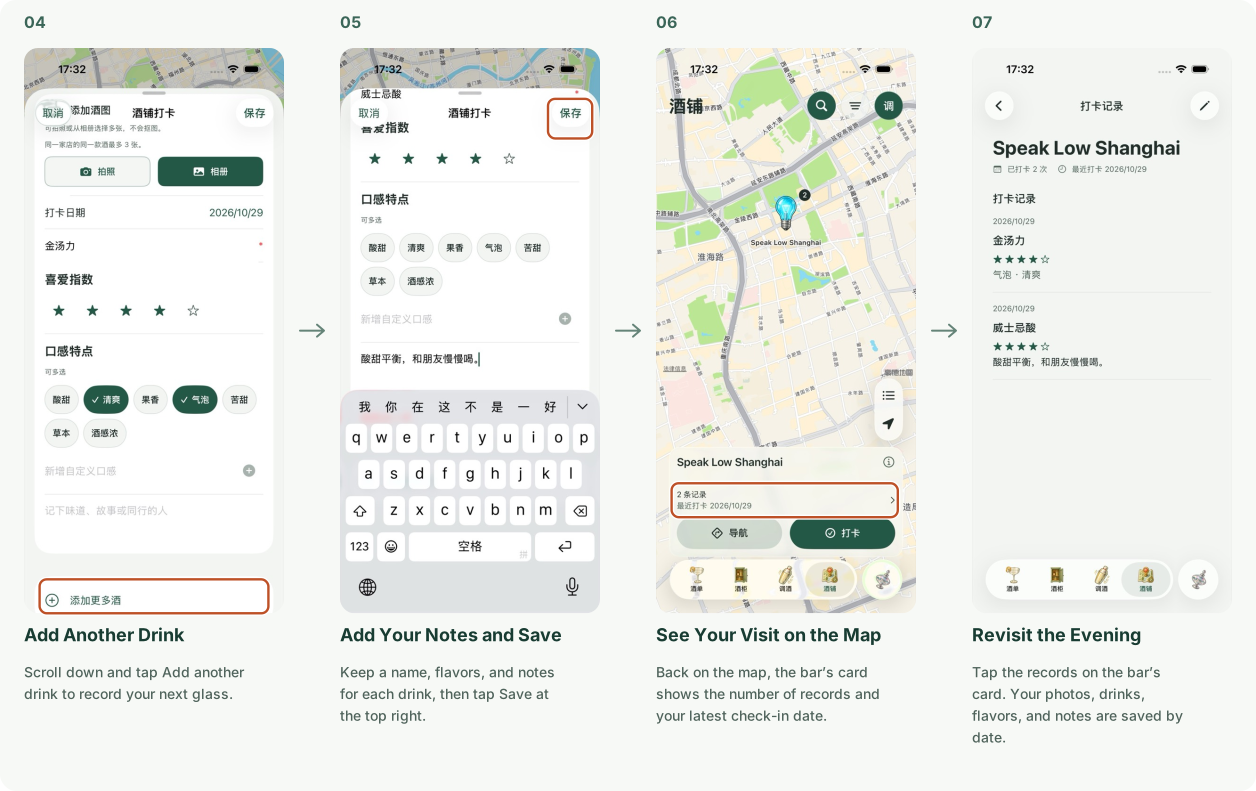
4. Add Another Drink: Scroll down and tap Add another drink to record your next glass.; 5. Add Your Notes and Save: Keep a name, flavors, and notes for each drink, then tap Save at the top right.; 6. See Your Visit on the Map: Back on the map, the bar’s card shows the number of records and your latest check-in date.; 7. Revisit the Evening: Tap the records on the bar’s card. Your photos, drinks, flavors, and notes are saved by date.

Venues

Review and Edit Visits

Find bars you have visited in your check-in history, then add to or edit your records.
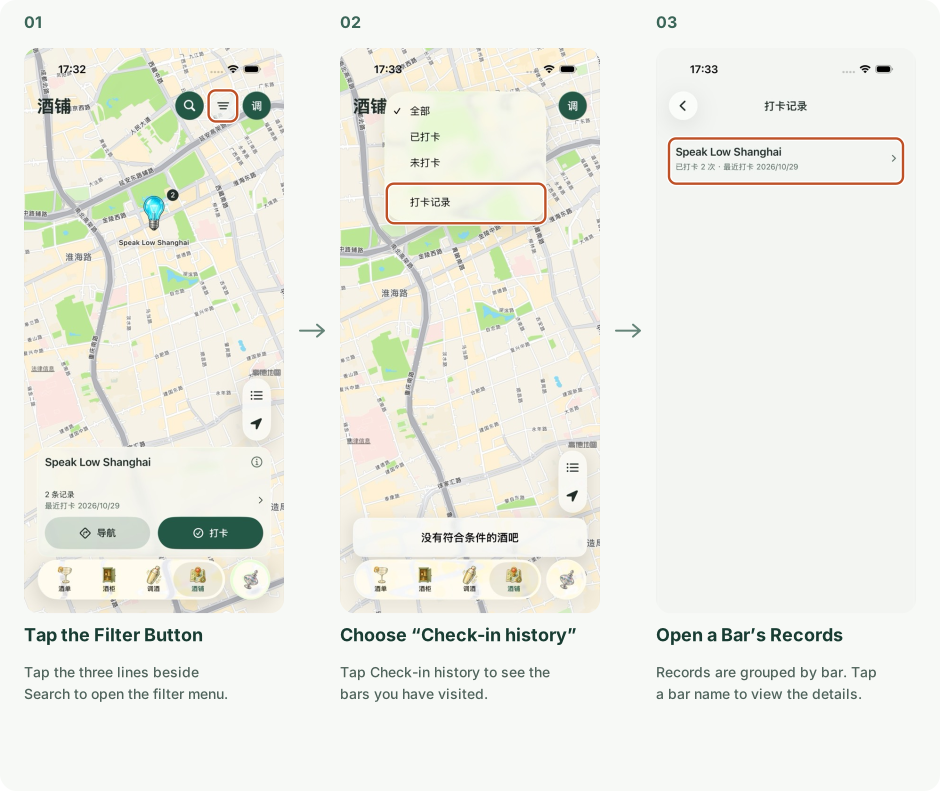
1. Tap the Filter Button: Tap the three lines beside Search to open the filter menu.; 2. Choose “Check-in history”: Tap Check-in history to see the bars you have visited.; 3. Open a Bar’s Records: Records are grouped by bar. Tap a bar name to view the details.
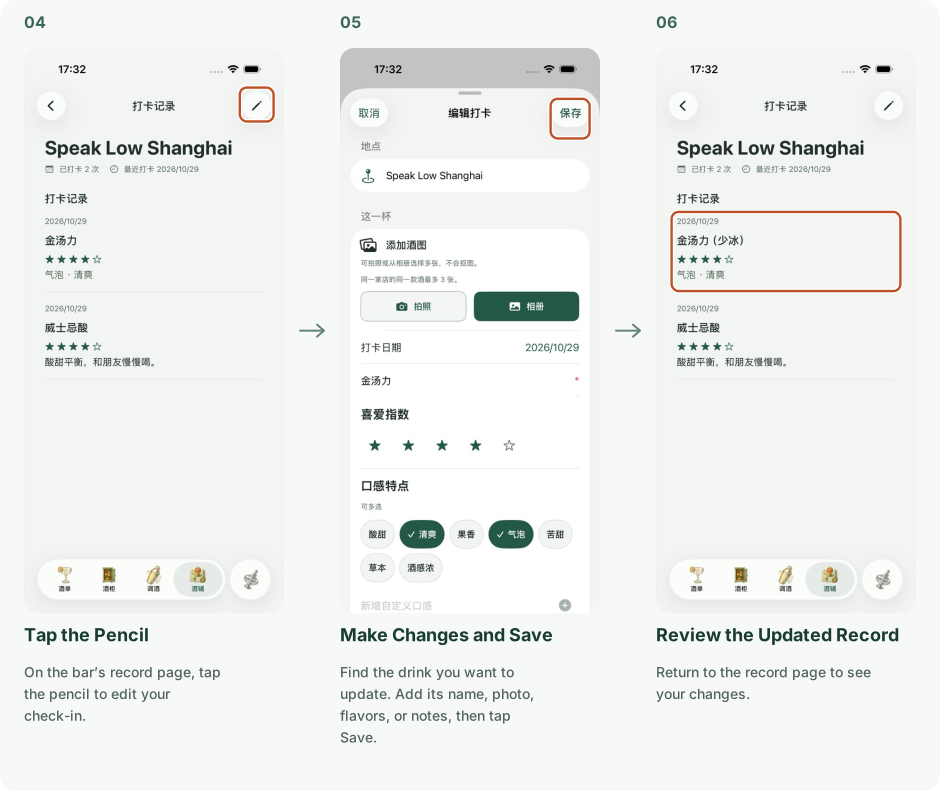
4. Tap the Pencil: On the bar’s record page, tap the pencil to edit your check-in.; 5. Make Changes and Save: Find the drink you want to update. Add its name, photo, flavors, or notes, then tap Save.; 6. Review the Updated Record: Return to the record page to see your changes.

Tipsy / Journal

Flavors, City Footprints

Keep favorite drinks in Recipes and visits in Venues. Your Tipsy Journal brings your flavors and footprints together.
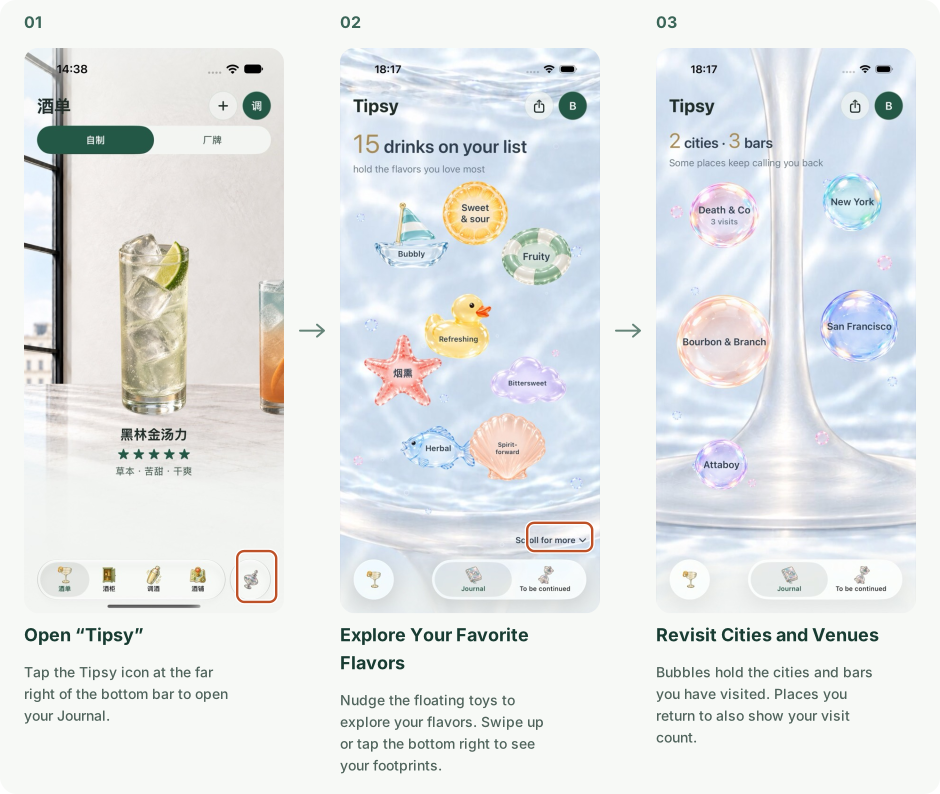
1. Open “Tipsy”: Tap the Tipsy icon at the far right of the bottom bar to open your Journal.; 2. Explore Your Favorite Flavors: Nudge the floating toys to explore your flavors. Swipe up or tap the bottom right to see your footprints.; 3. Revisit Cities and Venues: Bubbles hold the cities and bars you have visited. Places you return to also show your visit count.

Tipsy / Journal

Save and Share Your Journal

Save your flavors and footprints as a long image, or keep their gentle movement in a Live Photo.
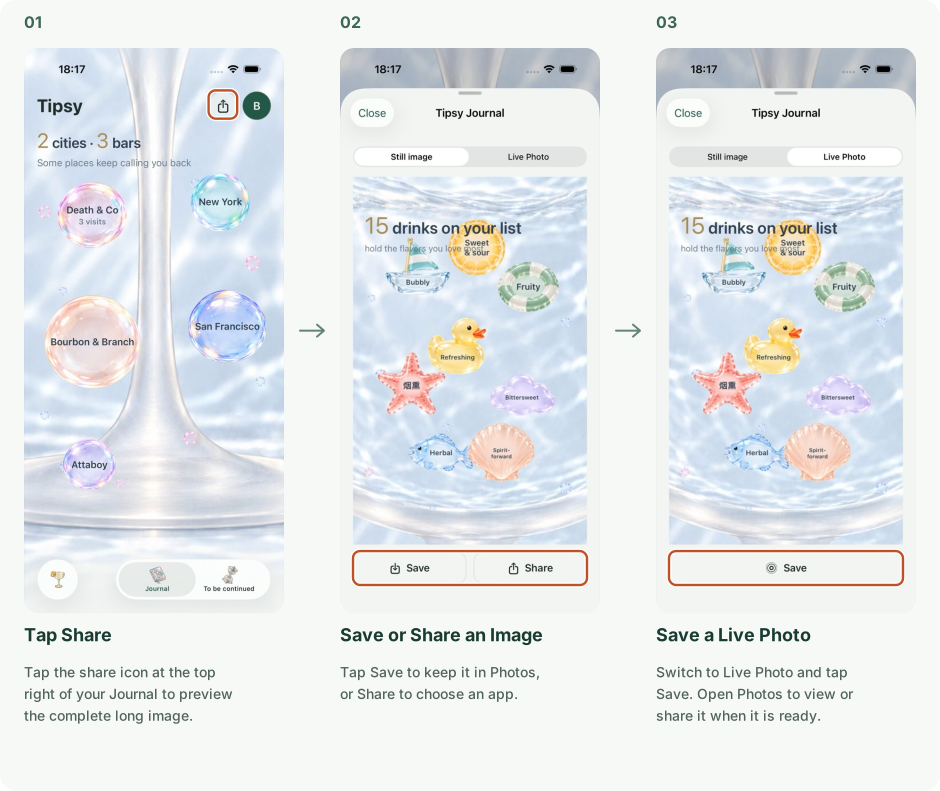
1. Tap Share: Tap the share icon at the top right of your Journal to preview the complete long image.; 2. Save or Share an Image: Tap Save to keep it in Photos, or Share to choose an app.; 3. Save a Live Photo: Switch to Live Photo and tap Save. Open Photos to view or share it when it is ready.

Tipsy

Coming Soon

More Tipsy experiences are on the way.

Widgets

Add to the Home Screen

Add a HomadeBar widget to your Home Screen and choose your favorite style.
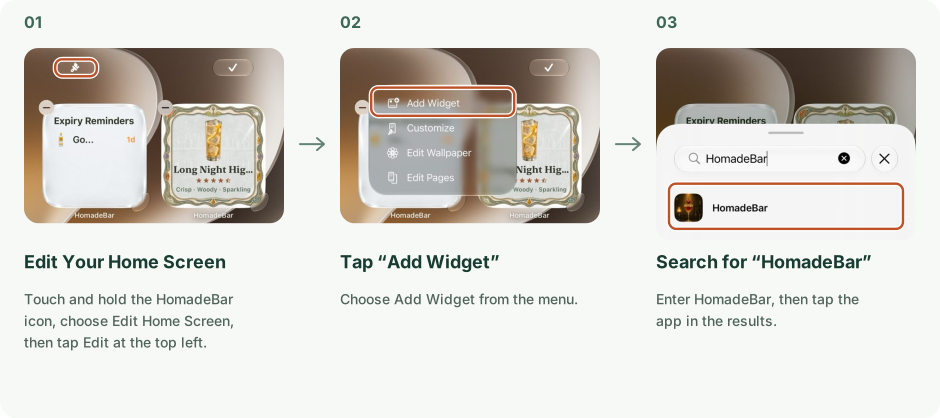
1. Edit Your Home Screen: Touch and hold the HomadeBar icon, choose Edit Home Screen, then tap Edit at the top left.; 2. Tap “Add Widget”: Choose Add Widget from the menu.; 3. Search for “HomadeBar”: Enter HomadeBar, then tap the app in the results.
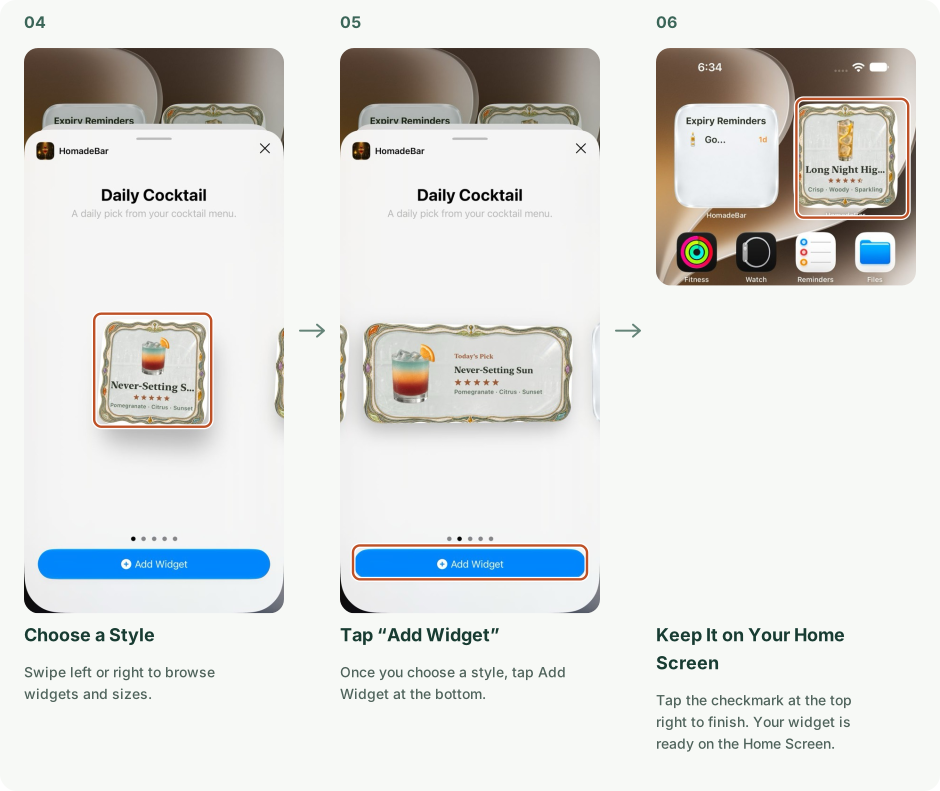
4. Choose a Style: Swipe left or right to browse widgets and sizes.; 5. Tap “Add Widget”: Once you choose a style, tap Add Widget at the bottom.; 6. Keep It on Your Home Screen: Tap the checkmark at the top right to finish. Your widget is ready on the Home Screen.

Widgets

Daily Cocktail

Discover a drink from your own Recipes each day. Tap to see what is on today’s menu.
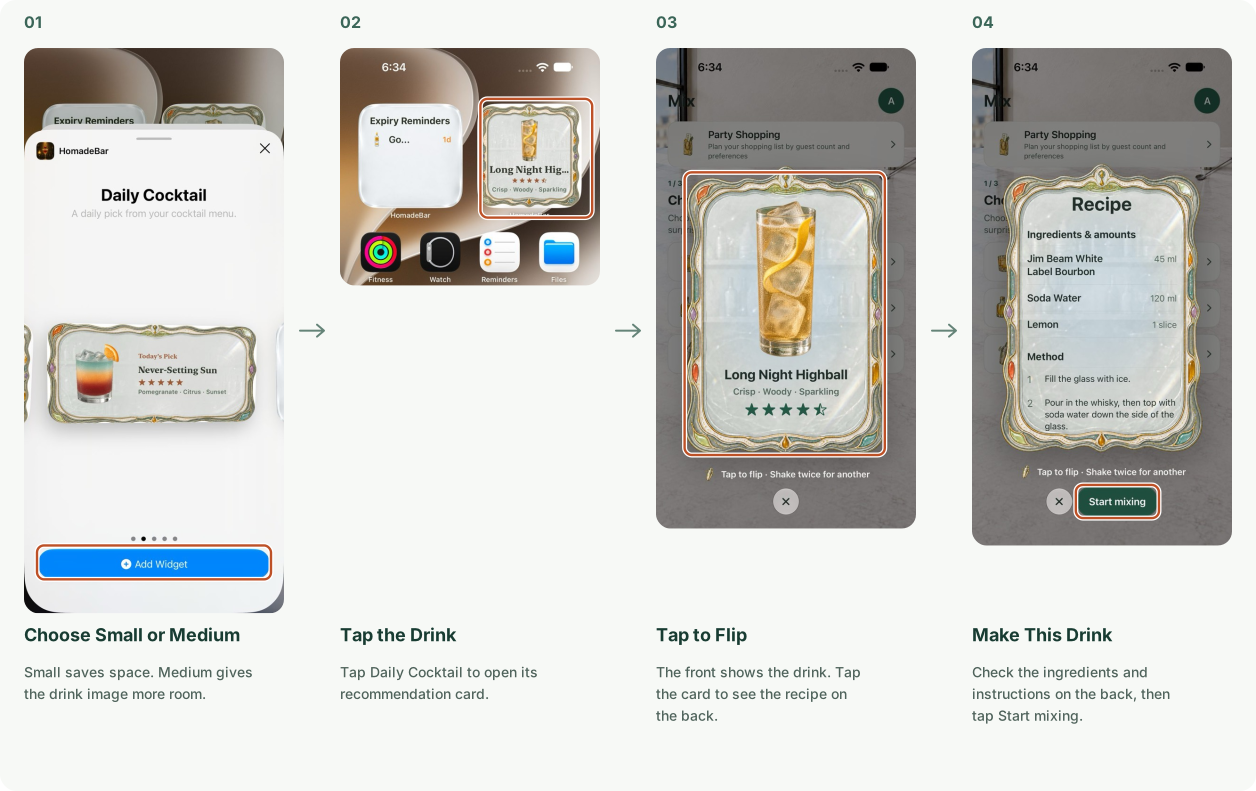
1. Choose Small or Medium: Small saves space. Medium gives the drink image more room.; 2. Tap the Drink: Tap Daily Cocktail to open its recommendation card.; 3. Tap to Flip: The front shows the drink. Tap the card to see the recipe on the back.; 4. Make This Drink: Check the ingredients and instructions on the back, then tap Start mixing.

Widgets

Expiry Reminders

See ingredients and ready-to-drink beverages nearing expiry on your Home Screen, so you can use them first.
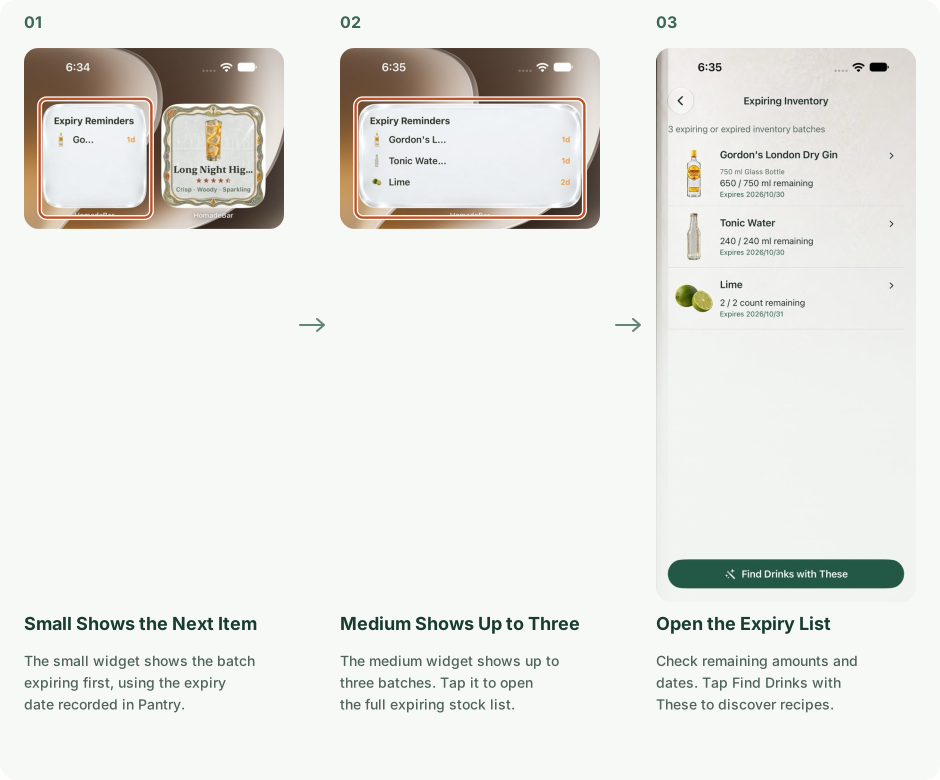
1. Small Shows the Next Item: The small widget shows the batch expiring first, using the expiry date recorded in Pantry.; 2. Medium Shows Up to Three: The medium widget shows up to three batches. Tap it to open the full expiring stock list.; 3. Open the Expiry List: Check remaining amounts and dates. Tap Find Drinks with These to discover recipes.

Widgets / Cocktail Cabinet

Add and Use the Cocktail Cabinet

Display the first nine drinks from Recipes on your Home Screen. Tap a glass to open its recipe.
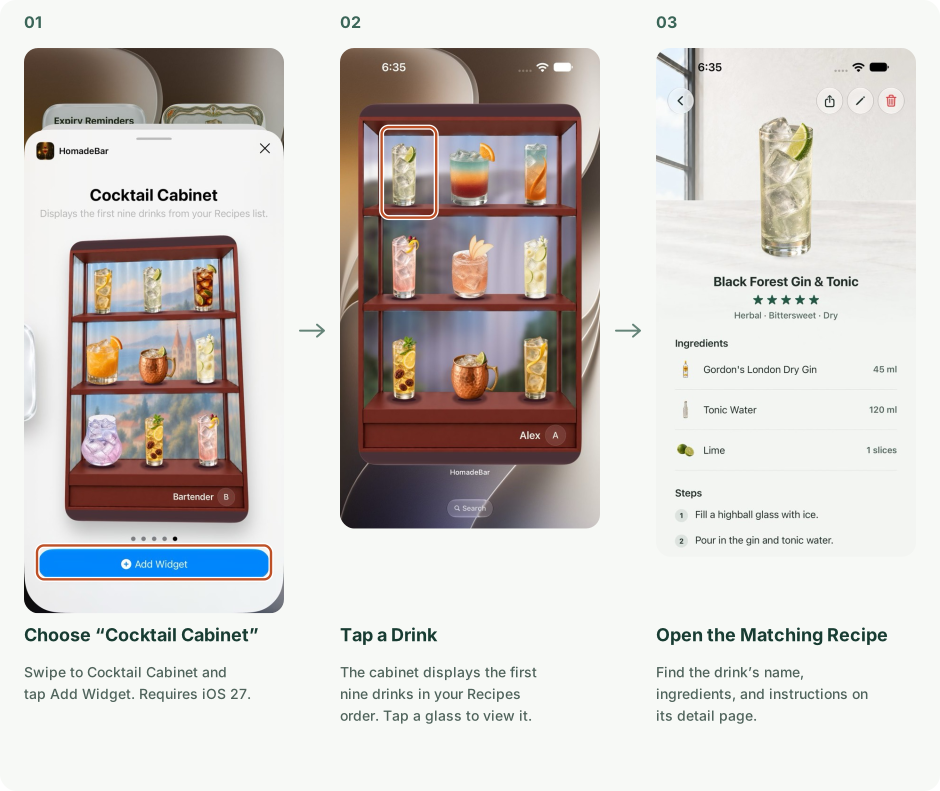
1. Choose “Cocktail Cabinet”: Swipe to Cocktail Cabinet and tap Add Widget. Requires iOS 27.; 2. Tap a Drink: The cabinet displays the first nine drinks in your Recipes order. Tap a glass to view it.; 3. Open the Matching Recipe: Find the drink’s name, ingredients, and instructions on its detail page.

Widgets / Cocktail Cabinet

Change Cabinet Backgrounds

Choose a daytime photo and a nighttime photo for your Cocktail Cabinet.
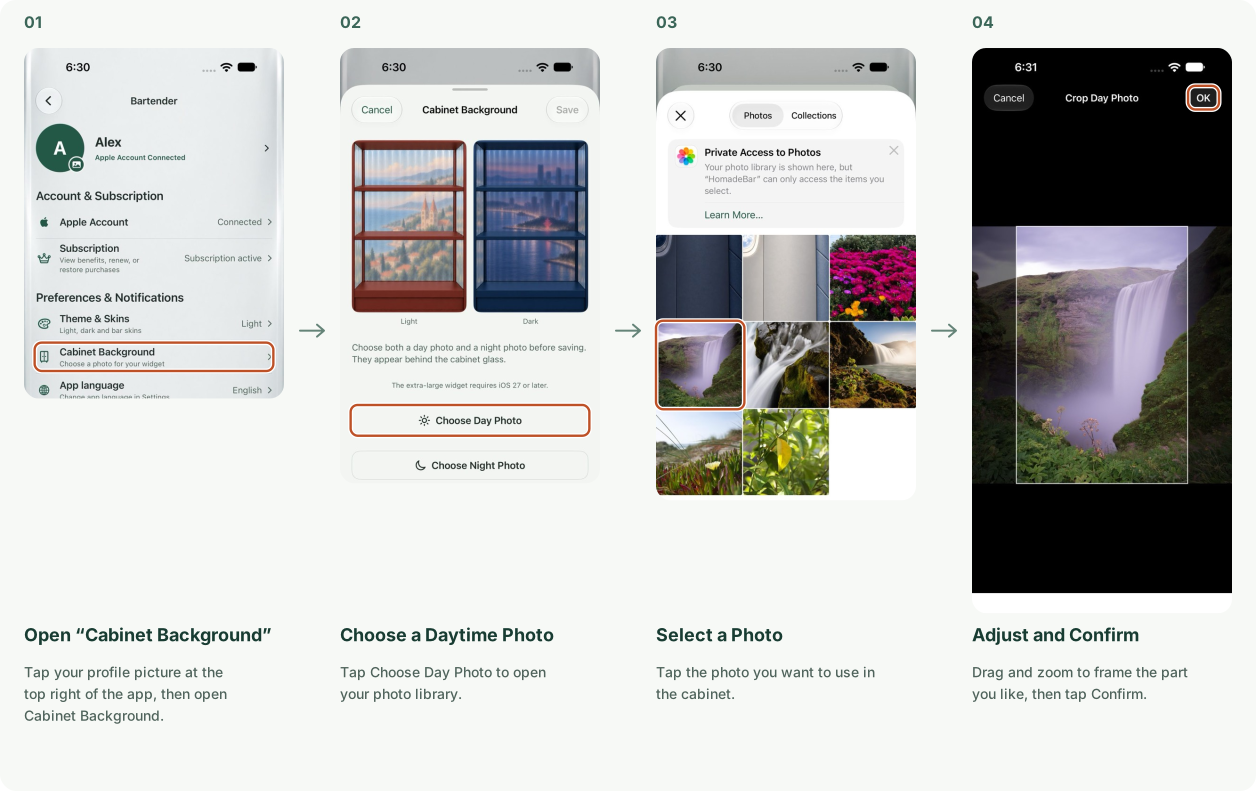
1. Open “Cabinet Background”: Tap your profile picture at the top right of the app, then open Cabinet Background.; 2. Choose a Daytime Photo: Tap Choose Day Photo to open your photo library.; 3. Select a Photo: Tap the photo you want to use in the cabinet.; 4. Adjust and Confirm: Drag and zoom to frame the part you like, then tap Confirm.
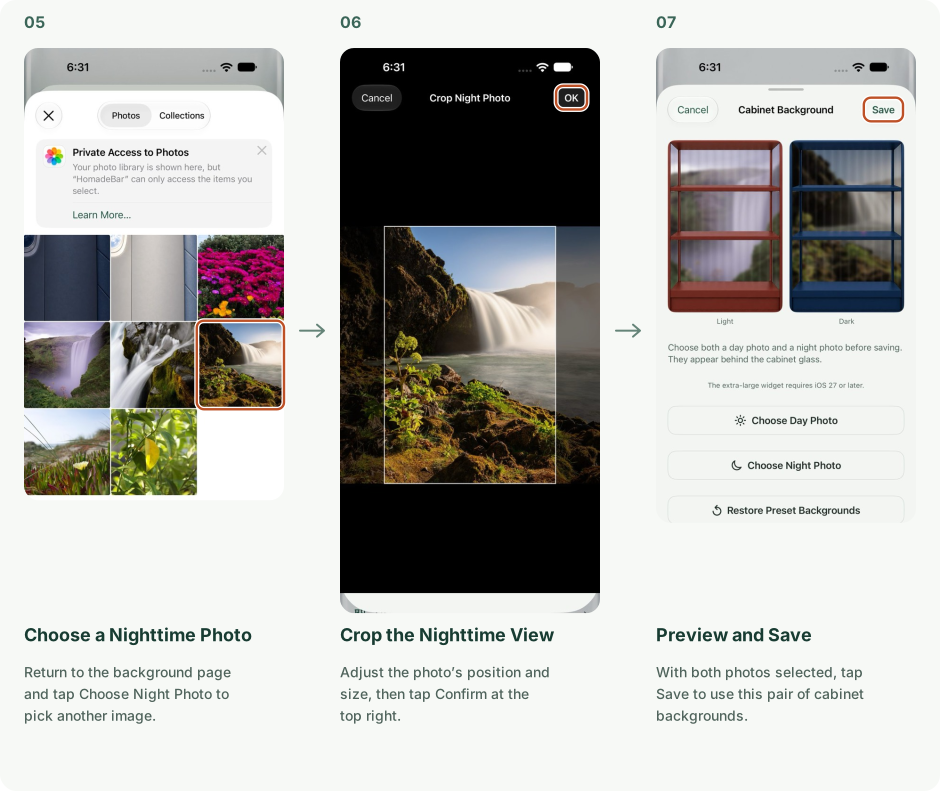
5. Choose a Nighttime Photo: Return to the background page and tap Choose Night Photo to pick another image.; 6. Crop the Nighttime View: Adjust the photo’s position and size, then tap Confirm at the top right.; 7. Preview and Save: With both photos selected, tap Save to use this pair of cabinet backgrounds.

Account, Sync / Bartender

Edit Your Profile

Give your home bar a new name and choose a profile photo you love.
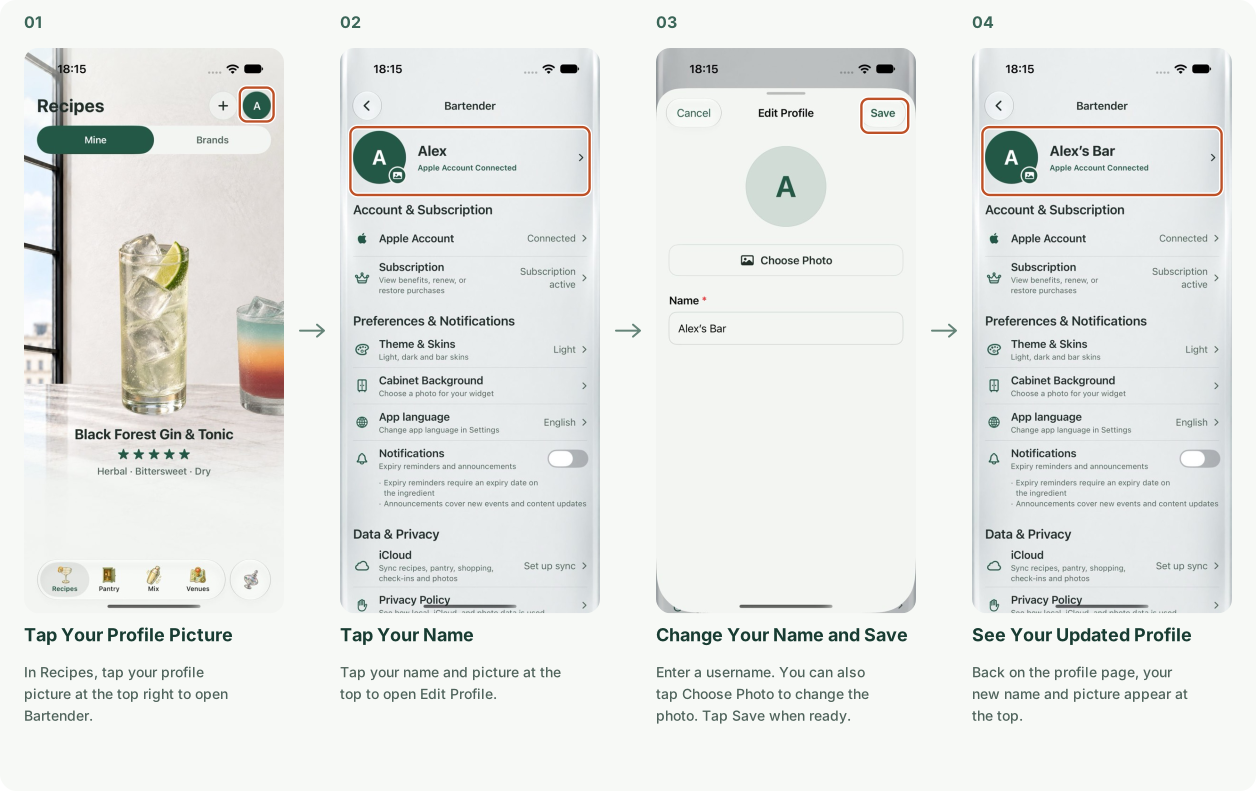
1. Tap Your Profile Picture: In Recipes, tap your profile picture at the top right to open Bartender.; 2. Tap Your Name: Tap your name and picture at the top to open Edit Profile.; 3. Change Your Name and Save: Enter a username. You can also tap Choose Photo to change the photo. Tap Save when ready.; 4. See Your Updated Profile: Back on the profile page, your new name and picture appear at the top.

Account, Sync / Bartender

Theme & Skins

Switch between day and night, then choose a scene for Recipes, Pantry, and Mix.
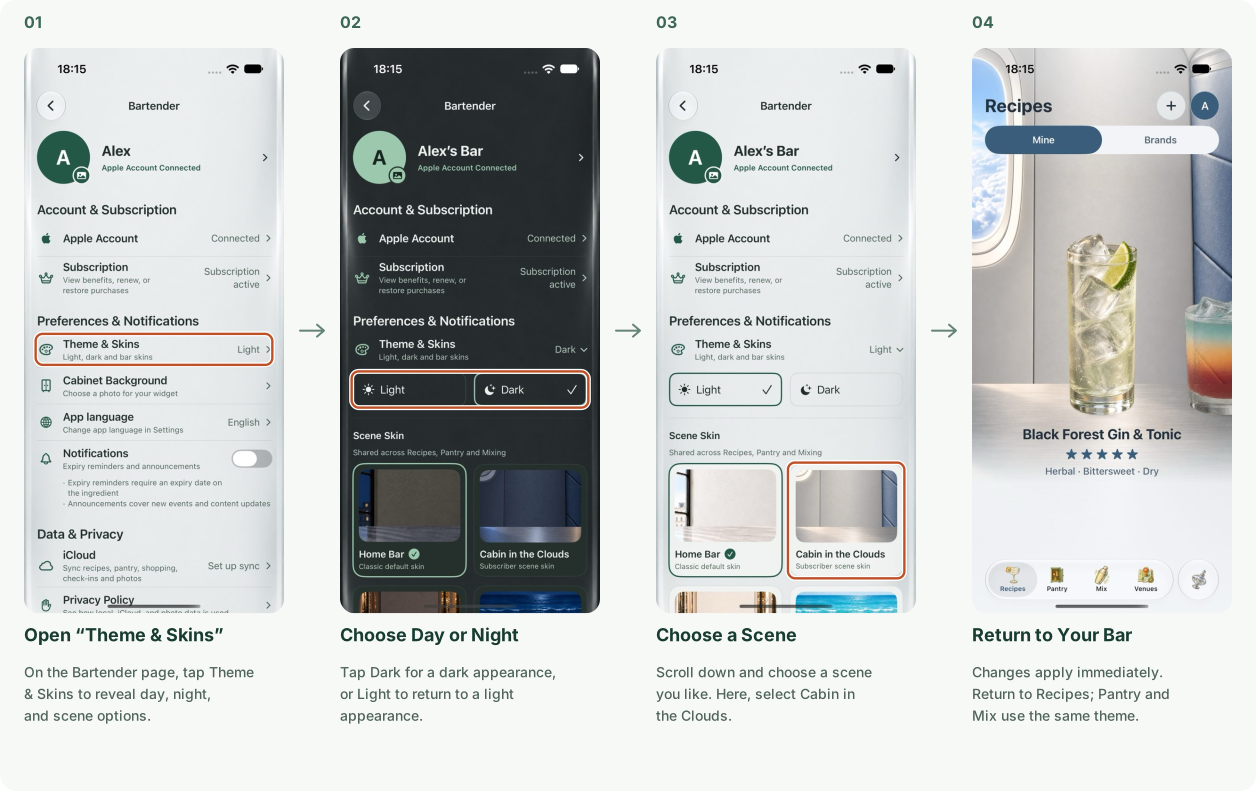
1. Open “Theme & Skins”: On the Bartender page, tap Theme & Skins to reveal day, night, and scene options.; 2. Choose Day or Night: Tap Dark for a dark appearance, or Light to return to a light appearance.; 3. Choose a Scene: Scroll down and choose a scene you like. Here, select Cabin in the Clouds.; 4. Return to Your Bar: Changes apply immediately. Return to Recipes; Pantry and Mix use the same theme.

Account, Sync / Bartender

Turn On iCloud Sync

Sync recipes, Pantry stock, check-ins, photos, and more across devices using the same Apple Account.
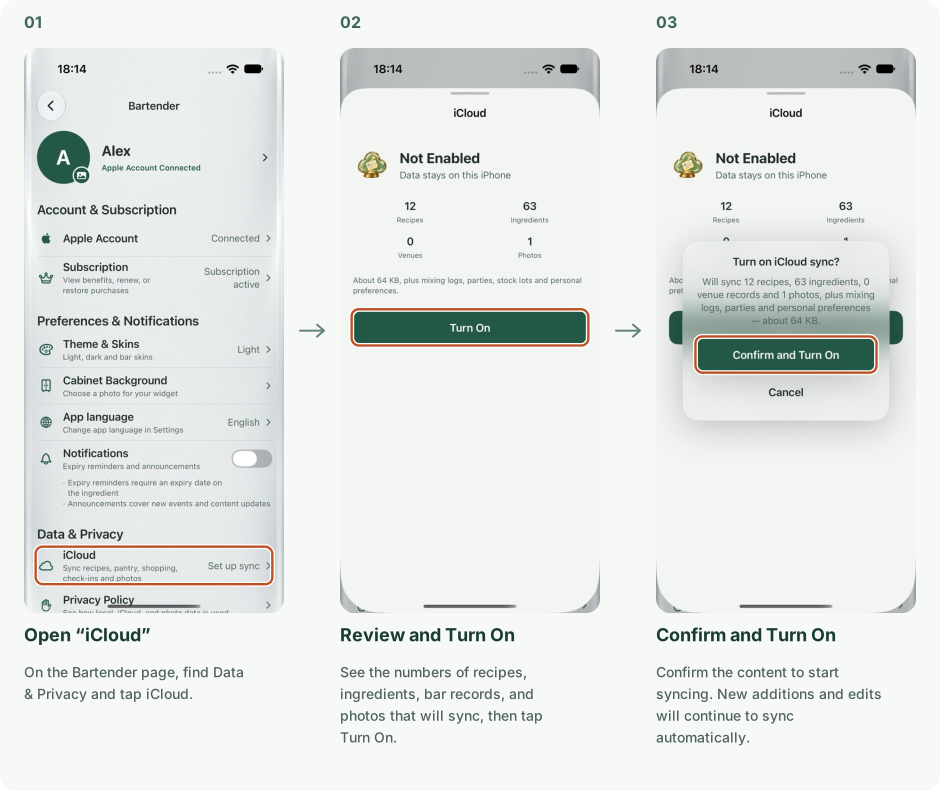
1. Open “iCloud”: On the Bartender page, find Data & Privacy and tap iCloud.; 2. Review and Turn On: See the numbers of recipes, ingredients, bar records, and photos that will sync, then tap Turn On.; 3. Confirm and Turn On: Confirm the content to start syncing. New additions and edits will continue to sync automatically.

Account, Sync / Bartender

View Subscription Status

Check your current HomadeBar subscription or open system settings to manage it.
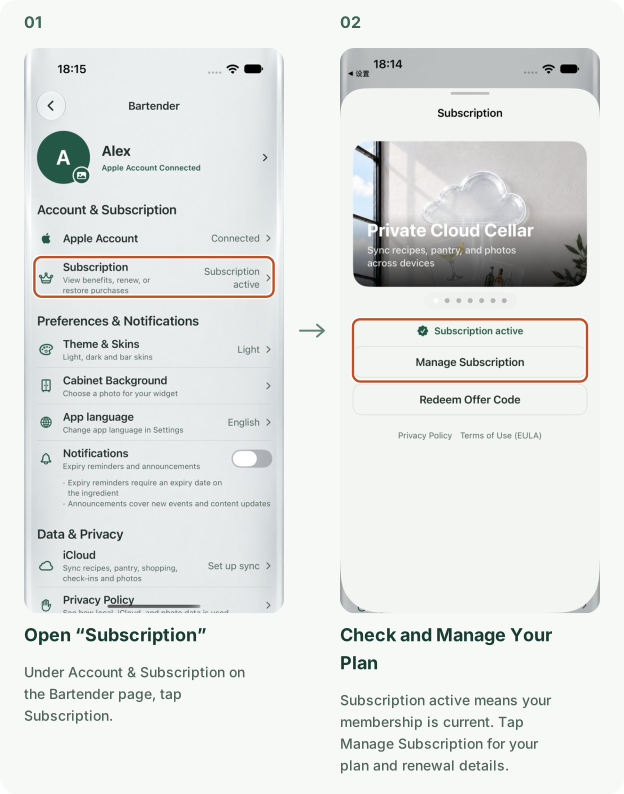
1. Open “Subscription”: Under Account & Subscription on the Bartender page, tap Subscription.; 2. Check and Manage Your Plan: Subscription active means your membership is current. Tap Manage Subscription for your plan and renewal details.

Account, Sync / Bartender

Enable Notifications

Get reminders for expiring Pantry stock and news about activities.
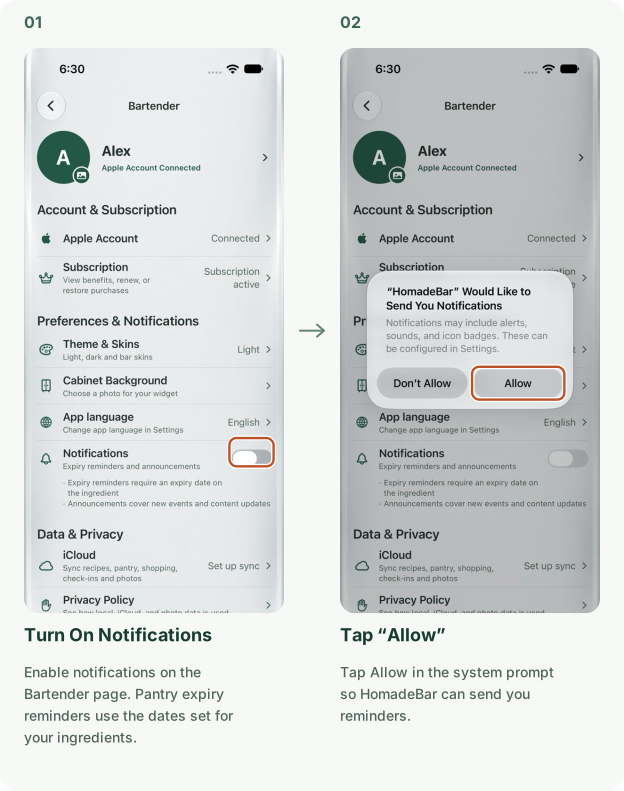
1. Turn On Notifications: Enable notifications on the Bartender page. Pantry expiry reminders use the dates set for your ingredients.; 2. Tap “Allow”: Tap Allow in the system prompt so HomadeBar can send you reminders.

Account, Sync / Bartender

Change App language

Choose a language for HomadeBar independently of your system language.
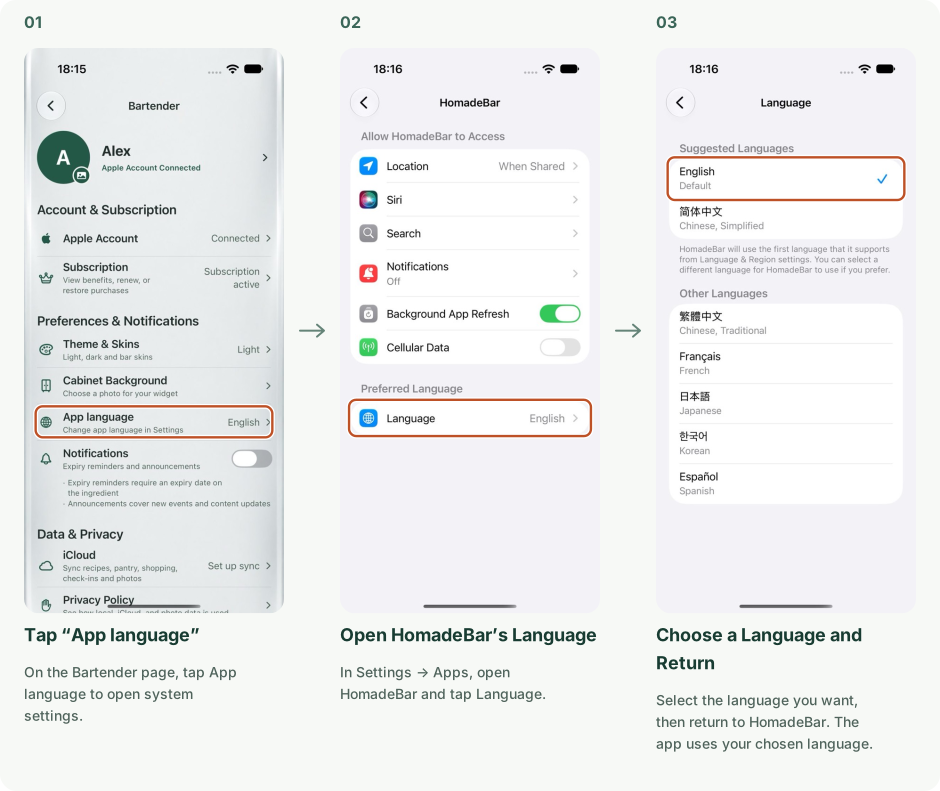
1. Tap “App language”: On the Bartender page, tap App language to open system settings.; 2. Open HomadeBar’s Language: In Settings → Apps, open HomadeBar and tap Language.; 3. Choose a Language and Return: Select the language you want, then return to HomadeBar. The app uses your chosen language.

User Guide

Need help?

For account, subscription, sync, and data questions, visit Help & Feedback.

View frequently asked questions